Chebacco News
Number 15, May 1997
[This issue of Chebacco News can be seen (in glorious colour) on the World Wide Web at: http://www.scotland.net/users/wbs/chebacco]
Our Website
Those of you who surf the World Wide Web will have noticed that Chebacco News is now at a different URL from previously. Formerly, I put CN on my web pages at work, in the University of Abertay Dundee. I now have a private web page, funded by yours truly.
There are two reasons for this – firstly, my employers could see that I had interests outside of work – a grave mistake in this age when workaholism is assumed to be the norm – secondly, I plan to retire later this year and my work pages will disappear anyway!
The downside of the new site is that I’m rationed to 1/2 megabyte of web space, so I’ll only be able to show one issue at a time, so the happy state of having the entire collection of Chebacco News’s on the web is to be no more.
To keep new readers happy, I can now offer earlier issues of Chebacco News as ‘bound’ (i.e. stapled) volumes. The two volumes are issues 1 though 6, and issues 7 through 12. If you’d like either (or both!) of these, the cost is $10 for each volume, including surface-mail postage, or £7 in British funds. Add two more dollars (£1.30) for air-mail. Please send cash only – it costs me a fortune to cash an overseas cheque. Commission for converting cash is much less.
News, enquiries etc should be sent to me:
Bill Samson,
88 Grove Road,
West Ferry,
Dundee,
DD5 1LB,
Scotland
Email:- wbs@sol.co.uk
Gil Fitzhugh ‘fesses up . . .
Gil Fitzhugh has been reflecting on his experiences of building a lapstrake Chebacco hull:
It’s true confessions time. Many of your newsletters have passed on information on how I was building my Chebacco, with the goal of helping those who hadn’t started yet to get off their duffs and get cracking. It has increasingly been occurring to me of late, that many of the techniques I used were suboptimal. Not wrong; I do have a nice hull. But I could have built it much more efficiently. But, if I’m ever misguided enough to build another glued-lap plywood boat, here are some of the things I would do differently.
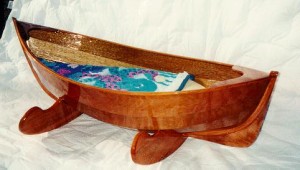
1. The Tom Hill approach is one I wouldn’t do again. It uses a series of battens to define plank lines. Tom’s boats aren’t particularly curvy; it makes sense to use battens to help shape the planks. But a lapstrake Chebacco is a pretty curvy boat. Since I disagreed with Phil Bolger’s plank shapes, I lofted my own. Then I cut molds to duplicate my lofted planks. Having done so, I didn’t need Tom’s technique to define my planks. I could have taken them direct from the molds. This is what I did when lofting the cradle boat, and as you can see it worked fine:
Gil Fitzhugh’s cradle boat – based on Iain Oughtred’s ‘Whilly Boat’ design
I used Iain Oughtred’s plank lines in defining my molds. There are no plank lines specified in the lapstrake Chebacco. You can use Tom Hill’s battens to come up with nice lines, or you can loft them. You don’t need both.
2. Having abandoned Tom’s battens, you can set up all the permanent bulkheads as molds (either substitute molds or extras, depending on where they fall). When you lift the hull off the building frame, the temporary molds are left behind and the bulkheads stay with the hull. This saves many months of fitting out. I suspect that’s the way sheet-ply Chebaccos are built [that’s right – Bill] ; no reason not to do likewise for lapstrake.
3. Using drywall screws to hold the planks togetherwhile the epoxy sets up is easy and effective while you’re doing it, and a monumental pain later. Some of the screws break off and have to be removed by brute force. All those zillions of holes have to be plugged and smoothed on the outside, and the ones in the cuddy have to be smoothed on the inside, too. All this takes forever and yields no job satisfaction. A better way is to make up a batch of plywood plank clamps, like this:
They can be made tight with a wooden wedge or two at the open end. I starte out to use them on the Chebacco, but the presence of all those Tom Hill battens meant the opening had to be quite wide and the closed end rather thin. When I tried to tighten the clamps with wedges, they bent at the closed end instead of pulling the clams together at the open end. So I gave up and went to drywall screws. I gave up too soon. I should have used heavier clamps. In the cradle boat, with planks of 1/8 inch luan ply, my clamps were scraps of 12mm occume ply from the Chebacco. They worked fine, and left no holes. If I’d taken the time to glue together two or three thicknesses of lumberyard ply for the Chebacco clamps, they’d have been plenty strong enough.
I’m grateful to Gil for sharing his learning experience with us. After all, it’s better to stand on the shoulders of our predecessors, than to start from ground level.
Story Chebacco-20 spotted at Maine boatshow
:
John Harris, of Chesapeake Light Craft, MD sent some email:
Neat show; I’d swear there was as much interesting stuff as at the WoodenBoat Show. Just crammed with wooden boats of all shades and an acre of boat-stuff vendors.
Brad Story was there with a lapstrake Chebacco 20. Marvelous finish and detail. (Were those NUTS and BOLTS holding the laps together?) I talked with his wife a little; she said they were going to try to ease out of big boat one-offs and concentrate on marketing the Chebacco as a production boat. I’ll be very interested in how that works out; they’ve already sold nine and are doing some nice advertising.
We left on Sunday after a mandatory stop at the LL Bean and Patagonia outlets.
Cheers,
John C. Harris
A new Sailing Pirogue from PCB & F –
John Harris also reports that he has built the prototype Sailing Pirogue – a new design from Phil Bolger & Friends. This pirogue is 11’6″long by 2′ beam. Drawings of this fun boat are available from Phil Bolger & Friends, 29 Ferry Street, Gloucester, MA 01930. Phil writes:
The plans of this design are on two sheets of 8 1/2″ x 11″ typewriter paper, rough but demostrably adequate. If somebody wants a set, we’ll charge US$25.00 for them, mostly “handling”, i.e. nuisance.
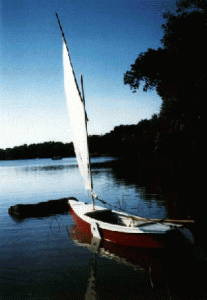
John Harris’s prototype Bolger Sailing Pirogue
Progress with Sheet Ply Chebacco:
Hi to All,
I’ve been making some, but somewhat slow progress. I’m building a sheet-ply Chebacco, and I’m building it in my garage. my progress to date…
cut-out my bulkheads and molds (I guess I’m very luckyto be living so close to ‘Boulter’ (plywood and specialty woods and materials, an excellent company and resource – Boulter Plywood Somerville Ma 617-666-1340)
I built my support structure (less than 2 feet to spare) in an effort to keep things straight, I stretched a wire from front to back and permanently mounted it near the
cieling over the boat centerline. On the wire I have a weighted string that I can slide along over the construction and verify the centerline alignment of individual
elements or the underlying structure, which gets hammered on occasionally. I also shot several areas of the floor/structure with spray-paint, to make it more noticeable
if my structure gets shifted.
I’ve cut-out, but not yet laminated the inner-stem
The transom is not yet reinforced or on the structure.
I have plenty of work ahead of me, and the expenditure of funds is at the rate that is hardly noticed (but the progress is certainly noticeable…if slow) which is
my general plan, small expenditures of money, over long period of time. (besides, I have only a little bit of either of those resources).
I do have some questions for the general Chebacco-building
population…
I’m trying to decide, whether to build the centerboard/case and install/mate with the bottom panel, at bottom panel phase of hull construction (soon in my case) ???
And I’m not clear on the intent, on the plans for the thru-hull-section for the rudder post…
is it lined with an appropriate sleeve for the post to wear/rub against, or is it epoxy-coated (specialty additives) for the stressful life of supporting the twisting and turning of the rudder?
Does any preparation for this area happen while upside-down in the hull stages?
By The Way, My garage is now adorned with a large framed color print of ‘Sylvester Ghosting In’, which was featured on a previous ‘Chebacco News’, (Bill, I hope that’s
OK) it’s beautiful and right smack-dab in front of my wife’s parking space in the garage…she still has use of her side of the garage…and we’re both enthused
by the artwork.
—
Jim Stewart mailto:stewarj1@polaroid.com
#2 Stewart Farm Rd.
Atkinson NH 03811
Regarding the hole for the rudder stock, the way I built my Chebacco all the wear is taken by a pintle (gudgeon?) at the bottom end and a steel plate with a hole in it on the oak ‘slab’ at the top. The hole itself is epoxied and painted, but doesn’t seem to get any wear. Some builders fit the CB case at the same time as they fit the bottom to the hull. I cut the slot later, and inserted the CB case before making the keel. If I was doing it again, I’d fit it at the same time as the bottom – much less hassle!
More questions on construction:
Here’s another email question and answer session between Burton Blais –bblais@EM.AGR.CA – and myself
Hello Bill:
Is it sailing season yet in Scotland? We’re nowhere near it here – it’s still snowing out there!
Three weeks until the moorings are laid. I was out in my Payson Pirogue at the weekend. First time on the water this year!
Anyway, I wonder if I might pester you with yet another request for tips on building my Chebacco. I’ve pretty well finished cutting and sorting out all of the parts & components for the centreboard and its case (all I need to do now is to fiberglass the inside surfaces of the case before putting the whole together – I’m waiting on this for warmer weather and for my shipment of RAKA marine epoxy – yes, despite my recent controversial query to the Bolgerlist folks about the possibility of using vinyl ester, I still intend to use epoxy for my Chebacco). In anticipation of the hull asssembly process, I wonder if you could give me your opinion on the following details:
1) For the inside surfaces of the centreboard case, will fiberglassing with epoxy provide sufficient protection?
That’s what I did and it seems OK. I understand that Brad Story epoxies a layer of Formica on the inside of the CB case – should save a lot of bother!
2) After cutting out the hole in the centreboard for the lead ballast, did you first epoxy the inner edges of the plywood to protect it from the water, or will this interfere with the “adhesion” of the lead? Perhaps it would be better to pour the molten lead in first, let it solidify, and then seal the surface thoroughly with epoxy?
Yes – I epoxied AFTER pouring the lead. It seems fine so far.
3) For the framing, floors, deck beams and carlins, what type of lumber should I use? Can I get away with using carefully selected spruce or white pine, or do I absolutely need stronger wood ( such as oak)? I’m assuming that the main function of the deck beams and carlins is to support the deck, and not to play a major role in the structural strength of the entire hull itself.
I used reclaimed white pine – liberally coated with epoxy and well painted – seems fine. If I’d had unlimited resources, I’d probably have gone for mahogany or Douglas Fir. The carlines themselves add little to the strength of the boat – they effectively extend the glueing area for joins between panels.
4) Again, what are the options for lumber for the keel cheeks?
If you can get oak, that’s probably best – but be careful, It doesn’t glue well, so back up your joints with S/S bolts. I used construction-grade fir (‘red deal’) which epoxies well but is more easily damaged than oak.
5) I seem to recall reading in your published building sequence that fort the bilge panels you are recommending two plys of 1/4″ plywood, rather than 1/2″, due to the twist in the panel near the bows. Unfortunately, most lumber in Canada is sold in metric sizes, and while we can find 1/2″ plywood readiliy enough, the closest to 1/4″ that I can find is actually thicker at about 8-9 mm. Therefore, if I go the route of using two plys of the thinner stuff I will actually end up with a bilge panel that is considerably thicker than 1/2″ , and which will not be flush with the other 1/2″ panels. Therefore, I may have no choice but to use the 1/2″ plywood for this job. Do you have any experience with this, or any tips on how I might be able to use this thickness and still get the correct twist in the panel ?
I can get 6mm ply here, which is pretty close to 1/4″. I should point out, though, that in fact I made the bilge panels out of 1/2″ (12mm) ply but you need a bit of brute-force to get the panels bent into position. I used strategically placed clamps and twisted ropes (‘Spanish windlass’) to coax them into position.
Sorry to bother you with so many questions, but you are simply too valuable a resource not to use! Many thanks in advance for all your help.
Regards,
Burton
Delighted!
Bill
Photo from Nova Scotia:
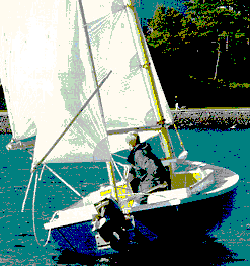
I found this image of Fraser Howell’s strip-planked Chebacco-20, ‘ITCHY’, on the World Wide Web. Unfortunately, the image has suffered somewhat in the transfer! If you can get onto the web, the URL is http://Fox.nstn.ca:80/~swbans/photo.html where the image is much clearer. Fraser tells me he’ll soon be sending some other images. Watch this space!
Fraser Howell’s strip-plank ‘Itchy’ scoots along.
That Tasmanian Chebacco:
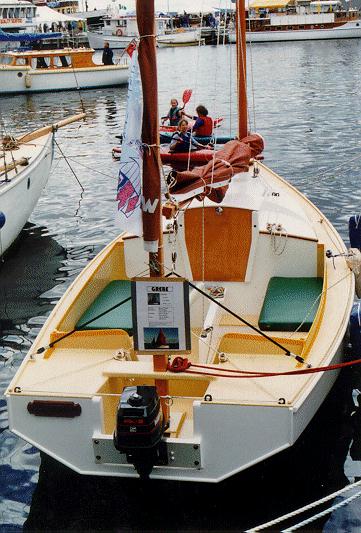
A number of you have written or emailed me asking for more details of the Chebacco that appeared on the fromt page of Chebacco News #14. Colin Hunt, who took the photos, takes up the story:
. . . as I wandered around the docks there it was – ‘GREBE’ – a chine built Chebacco launched last summer by Bruce Tyson of Port Sorrell in Tasmania. This craft is magnificently built and finished, and when I finally caught up with Bruce he described her as a very user-friendly boat. She was built according to the plans with no ballast and a 5hp motor.
GREBE
Colin also tells me that he has built a ‘Bobcat’/ ‘Tiny Cat’/ ‘Instant Catboat’ (surely a 12 foot boat doesn’t need all these names). He mentions that construction is very like that of the sheet ply Chebacco. I hope Colin sends some photos for a future issue.
And Finally . . .
When we first started this newsletter I wondered if it would survive as far as a second issue. I’m frankly flabbergasted at the amount of information we’ve disseminated. We seemed to have hit the market at just the right time when the first home-built Chebaccos were starting to appear. The World-Wide-Web has also been a tremendous help in reaching new Chebacchisti (- Gil Fitzhugh coined this word -), particularly through Chris Noto’s Bolgerlist, and Tim Fatchen’s Light Schooner home page.
Thank you all for your news items, past, present and future – Keep ’em coming!
Bill Samson


