Chebacco News 35

Jib

Main

Mizzen

(computer drawings of Chebacco sails courtesy Sailrite)
Been doing some research on sails for the Chebacco I’ll be building.
(wife says “I would have started it different…” So, Hi, I’m your editor. My name is Richard Spelling, I make boats. Among other things. I’m making a machine shop from scratch right now. I’ll post an article about me later. I have the plans for the Chebacco light cruiser (the one with the pilot house that kind of makes it look like a car) and will be building it. I’ve been doing some research on Chebacco sails…)
As I understand it, there are basically two options if you want good dacron sails for your Chebacco. Well, there are actual three options, but I did say “good sails”.
The first option, the one I have concerns with, it to have your local sail maker make you some sails for your new Chebacco.
I have two minor issues with going this route for my boat. The first is price, which from what I’ve heard, would put this option on the high side. Never actually asked for a quote from one, though. I’m a guessing it would be high. This would be a custom, one of a kind, never made this type of sail before job for your local sail maker. 99.9%ish of the sails made around here are the familiar triangle, high aspect, sloop rig sails. Which brings me to the second issue I have with going this route. It appears that cutting gaff sails, and mizzen sails as well, is something of a lost art. The cut of the sails is nothing like the cut of the main or the jib on a sloop. I find it unlikely the sail makers here in Tulsa, Oklahoma know the proper way to cut a gaff and a mizzen sail. Actually, at the local lake, I had one person comment that my AF2 Entropy was the only boat on the lake with a gaff rig.
Also, I’ve seen Micros, the venerable Bolger cat-yawl, with to much draft in the mizzen. The higher entry angel on the mizzen causing the boat to self-steer about 15 degrees lower than the Micro can go.
So, if the local sail makers are out, where does that leave one? There is one firm I’m aware of (there may be others) that make a lot of the sails for Bolger boats. Bohndell.
To see if they were up to speed, I sent them an email asking for the specs on their Chebacco sails. Here is what they wrote back:
The Chebacco is not a stock sail. Price for the gaff sail plan is $978 and $850 for the sprit plan. Please allow four to six weeks for delivery. Please call or write if you have any questions. Sue Chace
Can you send me the specs on the Chebacco sails, the gaff version?
What weight sailcloth?
How much hollow in the leach?
How much round in the foot, luff, and head?
Where is maximum draft located?
Same for the mizzen.
What kind of provisions are on the sail for connections to the mast hoops?
What kind of grommets?
Available in any colors other than white? If so, what price?
What kind of warranty comes with them?
Dear Mr. Spelling, Here are the specs you requested. Please understand that gaff sails cannot be designed on a computer, they must be done by floor layout, so these figures are approximate. Main: 3/4″ head round, 3″ foot round, and 2″ on the luff. Leech hollow about 4″. Maximum draft will be about 40% aft of the luff. Mizzen: 2″ leech hollow, 1″ luff round and 2.5″ on the foot. That sail will be fairly flat. We would be installing #l brass spur grommets on the luff for lashing on the hoops. We do not provide hoops. We would not recommend colored Dacron for these sails. The gaff main will be leech planked, the best fabric for this purpose is warp oriented, and is not available in colors. Furthermore, it would be difficult to match colors in two different weights, the main is quoted in 5.1 oz. and the mizzen in 3.9 oz. As for the warranty: We guarantee that if you have built the spars to plan, the sails will fit. After that, owner use and abuse will have the most effect on the longevity of the sails. Sail covers, or removing the sails will greatly increase the life of any sail. At this point, our earliest delivery date is August 15th. Thank you for your inquiry, Sue Chace
So, it appears, to my admittedly limited experience, that Bohndell knows what they are doing. Ignoring the part about “gaff sails cannot be designed on a computer”. I assume that means “gaff sails cannot be designed on a computer on the software we have”.
The next option I’m thinking of is a Sailrite kit. I went that route for the main on my AF2 Although, next time I won’t do it on the floor. OUCH!. I bothered Jeff at Sailrite for a couple of months with emails, finding out EXACTLY how he would design the sail for Entropy. Actually, I got enough information out of him to cut the sail myself if I had wanted to. The kit price was reasonable, not a whole lot more than the price of the raw dacron.
So I bought the kit, for about twice the amount I had already thrown away on poly tarp sails. It went together easily with the seam stick tape, and I sewed it on my cheap Wal-Mart sewing machine. At one point I was punching through 11 layers of dacron, with no problem.
I have to say that I am happy with it, and with the experience of making it., so, a Sailrite kit for the new boat was definitely a consideration. I wrote Sailrite, and asked them basically the same questions I asked Bohndell. Here is their reply:
Thanks for your questions, Richard. If you have not found our web pages on the Chebacco, check out the following:

<divclass=section1>
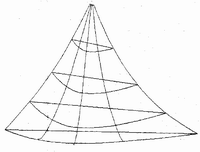
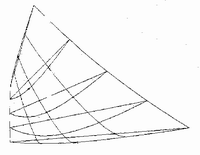
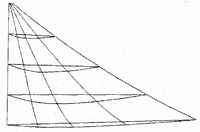
The fabric is 4 oz Dacron from Challenge. The shape of the sail can be anything you desire, i.e., leech hollow, edge round, draft location. But these are not matters that can be easily described without the 15 or so pages that the computer prints out on each sail we do (output that you receive when you order a kit). I hope you will just tell us for this first sail that you want the sail a bit fuller or flatter than normal or the draft a bit further forward or aft of normal or the leech hollow a little more or less than normal.

We provide #2 spur grommets in the kit for use in securing the sail to its spars. These sails are normally laced in place but you can use hoops if you desire.
Dr. Richard Burnham of Cummington, MA, just finished a set of Chebacco kits. You can reach him at dick@talkingcrow.net.
Jim Grant at Sailrite

So, basically he says “we can make it any way you want, buy it and we will tell you how it’s made, see our web page”. Kind of a disappointment, especially as how their web page says “Gaff mainsail made from 5 oz. white Dacron© using the designer’s plans”, and I was wanting to get info on the “designer’s plans” for these sails.
Also, Sailrite has the sail kits available in various colors. Perhaps they aren’t aware of “We would not recommend colored Dacron for these sails. The gaff main will be leech planked, the best fabric for this purpose is warp oriented, and is not available in colors” Actually, I think the leech on the Sailrite kit either uses tape, or is folded down a bunch of times like on the sail for my AF2. Maybe that is what ”leech planked” means? Have to ask.
Leech planked: The panels are parallel to the leech of the sail rather than the foot (cross cut), eliminating the need for battens. Let us know if you have any other questions. Sue Chace
So, it appears the Sailrite kit is “cross cut”. Wouldn’t’t “Leech hollow about 4″ eliminate the need for battens?…
Still, I had such a good experience with them doing the sail for my AF2, I decided to give them the benefit of the doubt. I contacted Dr. Burnham and picked his brain.
He even volunteered to write a couple of paragraphs for the new Chebacco!
Here goes on putting the sails together:
Sailrite kits were suggested to us by Phil Bolger who said that the Chebacco needed a full main and that he had information that Sailrite did it right. My wife, Ulla, and I got the three sail kits in the dead of winter and were looking things over when we called Jeff at Sailrite who suggested an order of making: mizzen, jib, main. The mizzen is flat and easy to make, the jib has a steel cable and some draft, and the main is the most challenging.
I must mention the “why” of the jib. My wife and I like to sail together but she is not about to be a knitter at sea — she too wants to be part of the sailing. In years past tending the jib on a racing sailboat was her part as I handled the main and the tiller. We hope to carry on this good working relationship aboard our Chebacco-to-be.
We used our venerable home sewing machine which handled every single job that Sailrite suggested for it — patches, edging, seaming, hemming of boltrope and cable, reef points. The machine is a Husqvarna some 23 years old and when we had it serviced as we started the sewing adventure there were some broken gears but the machine had a 25 year warranty! The after-sail servicing showed that the machine did the job without stress. The material for main and mizzen was 4.9 oz. dacron and the jib was 4.0 oz. Sometimes we sewed through 7 or more layers of cloth — clunk-clunk-clunk went the Husqy.
The way we built the sails was this: I used the sticky-tape to stick the seams together. Patches were given to Ulla who ran them through the machine. The sail panels were sewn using a Sailrite genius-stroke: we got a 10′ long 4″ diameter cardboard tube from a local carpet supplier (free), cut it longitudinally so we could slip a rolled up sail inside it. I would hold the tube on the port side of the machine while Ulla guided the taped seam through the machine (she rolled up a small amount of sail by hand and ran it under the machine’s arm. She didn’t care for sewing on the floor so mostly she stood up at the table feeding the sail through while I slow-walked the tube along.
Whenever we had questions, Jeff at Sailrite’s 800-number was there with more than enough information to keep us on the right path. All ingredients were supplied for the sails although we bought a small die set and rented the large #6 set for a week. Now the sails are in the loft, Ulla is looking after her weaving and sheep, and I’m building the boat.
Cheers,
Dick

Well, that’s about it. I think both Bohndell and Sailrite will give you a good set of sails. If you have more money than time/skill, the Bohndell sails are a good deal. For me, though, I’m thinking the Sailrite kit for the new boat. The deciding factors over going the Bohndell route being the much lower price, and the availability of the colored versions, and the fact I think they do the best design work on gaff sails.
***

A letter from Gil:

Joan and I spent June 25-29 at the New England Brass and Gas Meet, a biennial gathering of pre-1916 cars. Our 1912 Buick was one of 120 brass-bound beauties, and we drove it about 350 miles with a lot of shaking and rattling but no major convulsions.

The first day’s tour was to the Massachusetts coast, specifically to Gloucester with an ongoing spur to Rockport and back. Rather than go to Rockport through heavy shore traffic with our two-wheel brakes, leather cone clutch, square-cut gears and no stop lights or turn signals, we decided to try to find Philip C. Bolger and Friends. This is easier than it used to be. Most people in Gloucester, even in boat-related places, had never heard of Phil. But his concession to modernity, to the extent of getting a telephone (hooked only to a FAX line, and not used for speech), resulted in PCB&F being listed, complete with street address, in the directory. After we had chugged a few miles down a side road, we came to Resolution, Phil’s old liveaboard boat, moored in the front yard of a house. We parked in the street, went to the house, and walked all around it looking for the most likely door to knock on. Eventually, Suzanne appeared on an upstairs deck. After I told her we were the Fitzhughs who were building a Chebacco, that we were in town and wanted to meet her and Phil (who by then had also appeared), we were very cordially welcomed and invited in for tea and conversation.

And what wide-ranging conversation! The car, of course, was an ice-breaker. Suzanne is very knowledgeable about cars, having rebuilt a favorite station wagon and having worked extensively in auto mechanics in her native Germany (I hadn’t realized she was born abroad). She said there just weren’t many really old cars in Germany, since they didn’t survive the war; I said many of ours had been melted down in scrap drives during the war and used to make the bomb casings that helped ruin the ones in Germany. Phil had fond memories of growing up with Model Ts, but had owned two Crosleys in his youth. The Crosley was an American car almost as big as an English Morris Minor, and not at all related to the British Crossley (two esses) that was older and much more substantial. What mostly impressed Phil about the Crosley was how roomy it was; was this the beginning of his nonconformity?

Maybe the origin of the name Philip C. Bolger and Friends (plural, when most of the world knows the company as only Phil and Suzanne) is his comment: “I married six cats.” Indeed, there was always something furry in view, and one of Phil’s ongoing concerns is keeping the inside cats inside and the outside ones outside.

The current flap about licensing naval architects, recently discussed with various degrees of vituperation in both WoodenBoat and Messing About In Boats, has Phil and Suzanne well and truly exercised, and for good reason. A lot of well-known and highly regarded boat designers don’t have the technical academic background to design big ships, and so couldn’t pass the proposed licensing tests. If I want a custom-made aircraft carrier, I’ll go to a naval architect. If I want a sailboat, or something to catch fish from, I’ll go to PCB&F and damn the licenses.

In politics, Phil votes Libertarian. (Why am I not surprised?) We agreed he was the Libertarian equivalent of a Yellow Dog Democrat (for those overseas, that’s someone who’ll even vote for a yellow dog as long as it runs as a Democrat). Phil has no particular regard for Ralph Nader and “that guy with the ears” (Ross Perot); he thinks they just wanted an ego trip. The Libertarians are trying to build a party that believes in smaller and less intrusive government, oxymoronic as that may sound.

Phil said he owed Bill Samson a letter. He was very complimentary about Bill’s efforts with CN and hoped someone would be found to take it over. This was before either of us knew of Richard’s succession.

We ended the visit by taking P&S for a ride in the Buick. It was altogether a delightful interlude, and no doubt much more pleasant than the drive to Rockport and back would have been.

Our tour on the last day took us to Newburyport, where I visited a small maritime museum. The price of my ticket entitled me also to visit Lowell’s Boat Shop, the oldest in the country, founded in 1793. We had a good tour, and I said I was building a Chebacco. One of the boatbuilders said a friend of his, Brad Story, had built several. But, he said, Brad has gone back to his roots – being an artist, which he was before he got into boats – because of health problems. He has serious back trouble and has also had both ankles fused. This, folks, is a real shame. Remember, Brad commissioned the design in the first place, so he’s the cause of what many of us are building as well as the builder of what not a few of us are sailing.

Best regards to both. Richard, welcome aboard.

***

A letter from Jamie:

Hi Richard

I’ve fixed up my cockpit so I can raise the floorboards to seat level, for sleeping.  I sent a note to Bill Samson about a recent cruise, and he thought this idea might be of use to other Chebacconists, so I’m sending it to you for the new Chebacco page, if you want it.  I’ve attached pictures of Wayward Lass showing these, and a couple of other additions.  Feel free to edit as needed.  These modifications have all been tested in use and worked just fine.
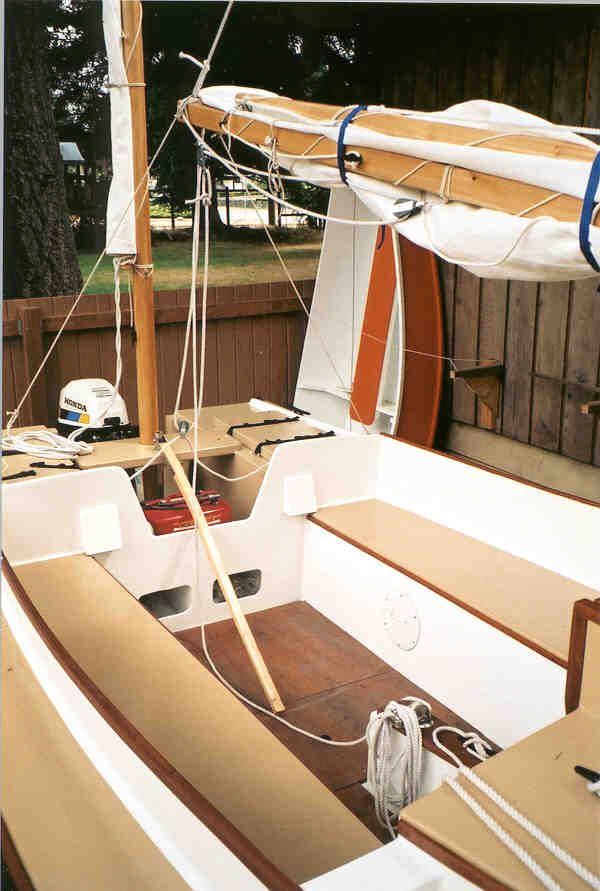
Floorboards

My floorboards are 1/2 inch plywood, all cut to the same length, including
the two that run up along the centerboard case.  (The small gaps this leaves
at the end of these two are filled with spacers of the same material).

floorboards

I used a jig made of the floorboard material to mark where the upper edge of
the supporting cleat, or rail, should come to.  The rails themselves are
made of leftover trim, an African mahogany of some description, finishing
about 5/8 square.  I screwed these to the seat fronts, bedding them in
polysulphide so they can be removed if need be.

floorboards-halfway

To span the cockpit safely, the 1/2 inch ply has to be reinforced underneath
— I used fir, 3/4 x 1 1/2 inch, on edge.  This can cause complications, as
the reinforcing pieces have to be positioned to clear the centerboard case
and mainsheet block while the floorboards are raised, as well as the bottom
of the boat and anything stored in it while the floorboards are in their
usual position.  A 3/4 inch ply might work without reinforcement, but better
test it first.

floorboards-sleeping1

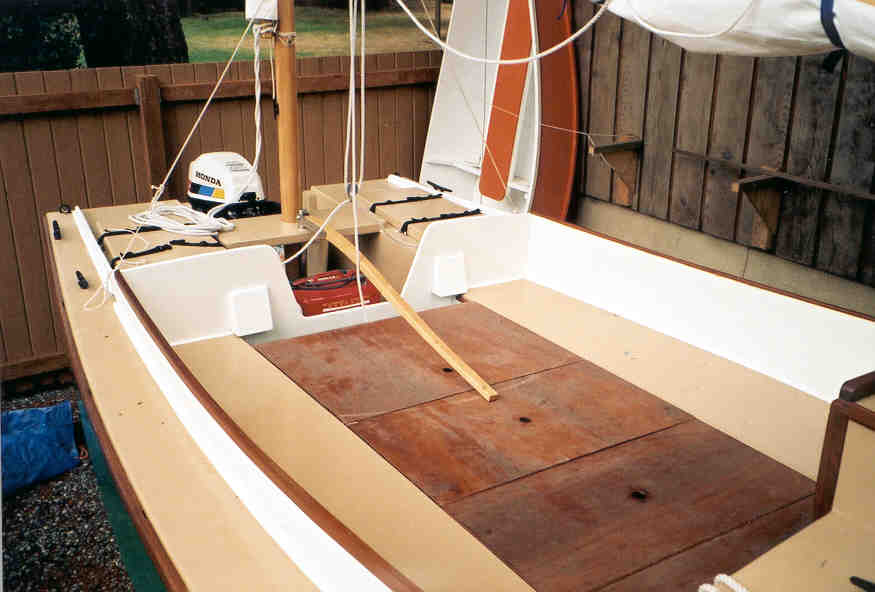
Note that the mainsheet has to be out of the way for sleeping.  I loop it
over the end of the boom and let it run from there under the platform.  The
boom is held steady by the two short lines to the quarters.  (I also use
these when anchored or motoring as the mainsheet alone lets the boom wag
back and forth a bit.)

mainsheet

I’m thinking of adding extra boards for use as seats at either end of the
cockpit, or as a table.  These would be narrower, and could be stored under
the seats (reached through the cabin) when not in use.

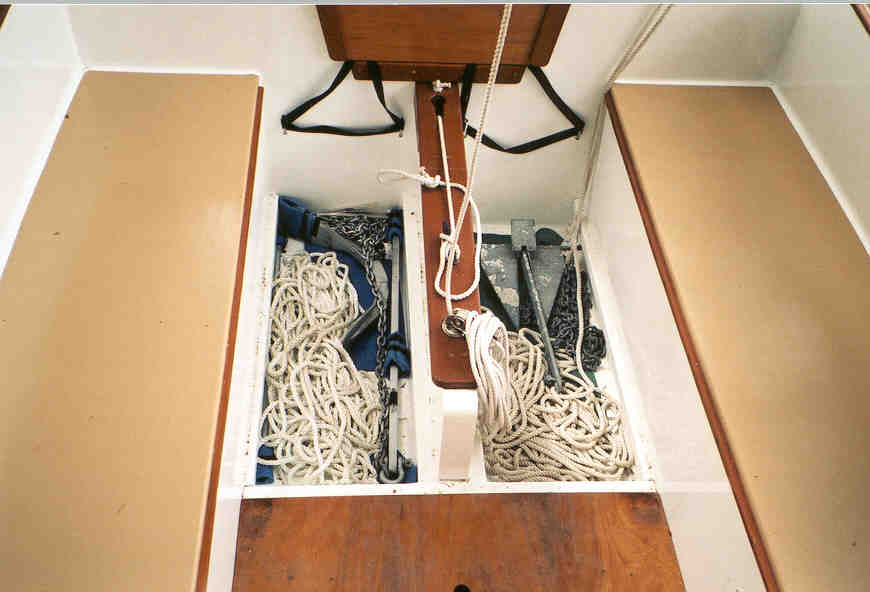
While I had the boards out, I thought I might as well take a picture showing
how I use the space below for storing my anchors (8# danforth and 25#
fisherman).  With the rope flaked (piled) as shown, it pays out without
kinking.  Beer is stored under the next board aft where it will stay cool
(but not icy) – a very useful space all round!
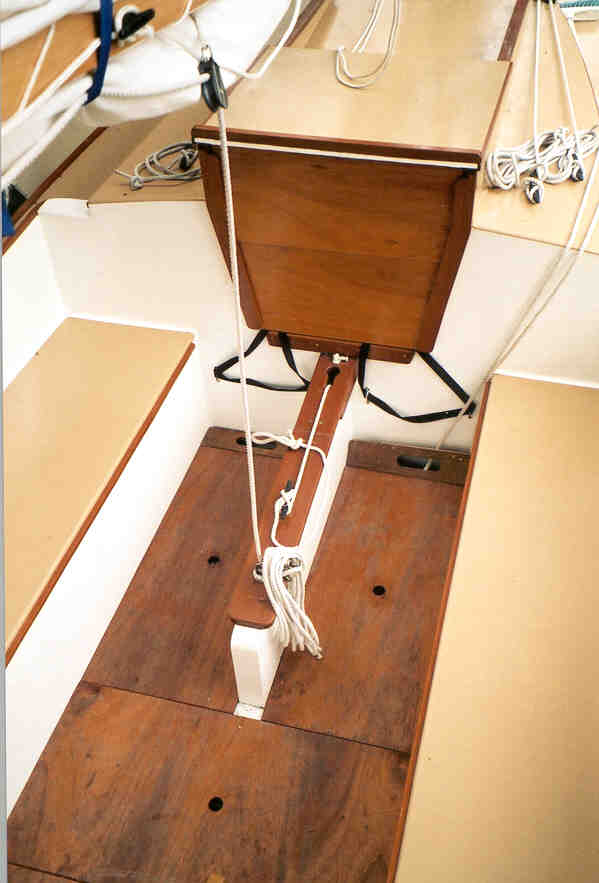
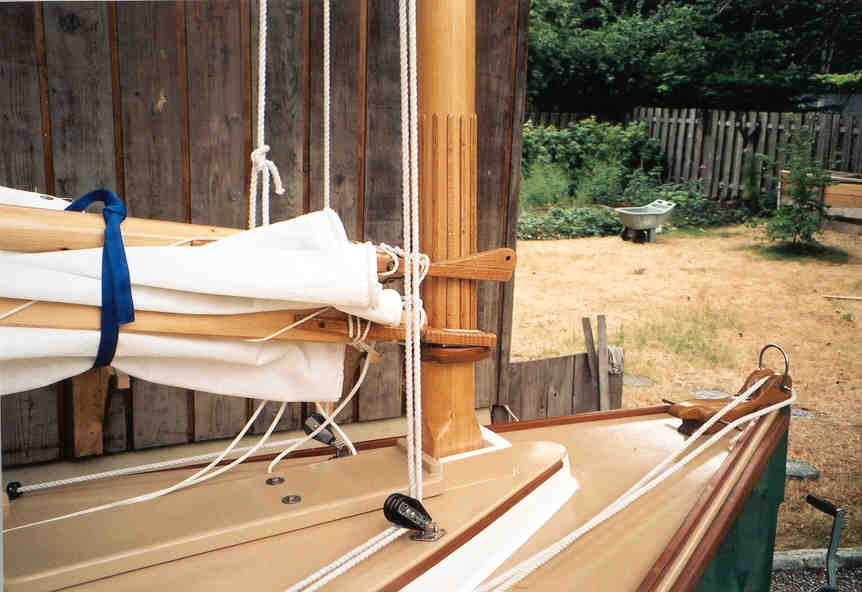
anchor locker

Mast collar

Since my mast is square at the bottom, when the halyards were slacked off
the jaws used to jam and the boom couldn’t swing.  To make it easier reefing
and furling, I added the collar shown on the mast.  The collar lets the boom
roam around without damaging the jaws.  It also keeps the boom up when
anchored with the tarp set up for a tent.  The vertical strips above the
collar are for the chafing when sailing — my mast was starting to get a bit
chewed up by the jaws — I also leathered the jaws.  The rope at the bow is
for the danforth, it’s left like this so that the anchor can be dropped
quickly from the cockpit.  (The Jonesport cleat on the bow is made as drawn
on the plans, works very well too, holds the anchor rope right on the
centerline, is worth the time and effort.)

mast collar

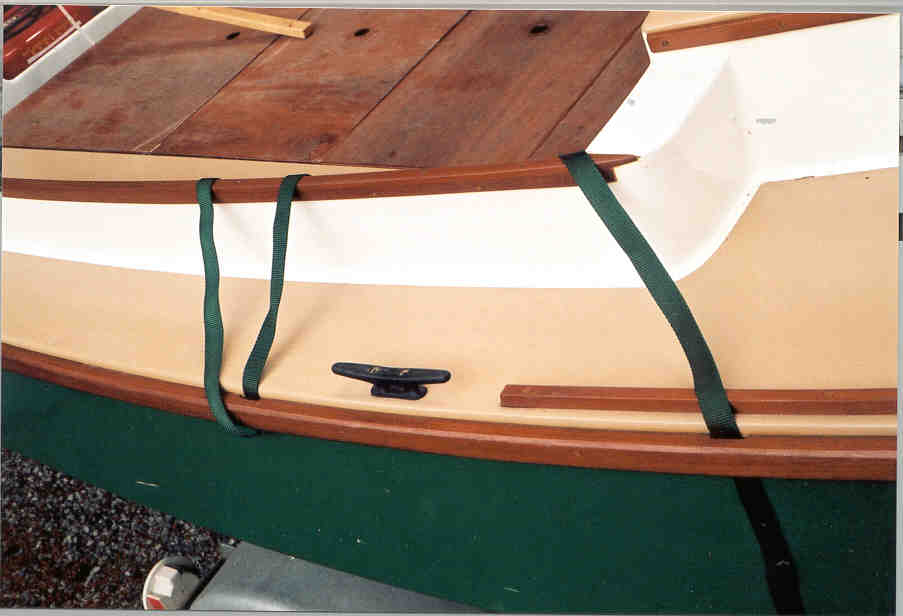
Finally, I’ve shown the slots in the gunwales, designed to hold 1″ webbing
for tying down a boom tent.  I’ve got a slot every 2 feet or so, from just
behind the cockpit to just ahead of it — these need to be cut before the
rubbing strip is fastened on.  I haven’t made a real tent yet, but the slots
work fine with the polytarp tent!

tie down straps

That’s the lot.  Good luck with the newsletter, looking forward to your
first issue.

Cheers,

Jamie

Chebacco News 03

Chebacco News

Number 3, April 1995

A Frequently Asked Question

Several of you have written to me asking for the address of your nearest neighbour, so that you can perhaps get together and chew the fat. My approach to this has been to contact the neighbour, and ask them to get in touch with the person making the query. That way, I’m not divulging people’s addresses without their permission. It would obviously save us all a lot of hassle if I were to send out an address list with the next newsletter. Those I have spoken to individually say they’d have no objection to this, but some of you might. If you don’t want your name and address to appear in the address list, please let me know right away. In the next newsletter I’ll publish the names and addresses of those of you who remain silent!

Surfin’ the Internet

Three or four of us have Internet addresses and communicate using eMail. It would even be possible for me to send out this newsletter (text only) this way. (I did try sending the last one, but the photos take up one helluva lot of space and the message arrives in lots of parts which are a hassle to reassemble.) Another possibility is that I could put it up on the World Wide Web complete with colour images; but I suspect that not many of us have access to web readers. Anyway, if you’re into the infobahn, my address is:

w.b.samson@tay.ac.uk

Let me know if you have any ideas in this direction.

“Boats with an Open Mind”

I recently got my copy of Phil Bolger’s new book (title above) which was published by International Marine of Camden Maine in November 1994. There’s a great chapter on Chebacco boats – the versions except the original cold moulded one, and including a “glass house” version with balasted keel, more freeboard and a huge cabin with glass sides – worth thinking about if comfort matters and you plan to sail in rougher than average waters. You can even steer it from inside the cabin! As well as this, there are another 74 designs, some old, some new. I must confess I devoured every word of it with great relish. Essential reading for all Bolger fans.

Lapstrake Construction

Last time I gave you a blow by blow account of how a sheet ply Chebacco could be put together. In order to redress the balance for lapstrake builders, Gil Fitzhugh of Morristown N.J. gives the following account of the method he is using for spiling and fitting strakes:

I’ve accidentally blundered into what I think is an easy way to determine plank shapes in glued lapstrake plywood construction. I haven’t seen this written up anywhere, so feel free to put it in the next newsletter. It assumes you are using a building mold the way Tom Hill does, in his book “Ultralight Boatbuilding”, with a series of ribbands to define where the planks go.

Unlike the Chebacco, Tom’s plans and molds are small. He uses 4mm ply, narrow enough to be clamped into place with C-clamps. He clamps some plywood in place and traces the shape from the back by tipping the mold. For me to do that in the Chebacco means getting under the mold between each pair of stations, tracing the shape onto cheap quarter inch ply, and spiling it onto solid gold occume plywood. The pieces are heavy and awkward and the process requires considerable agility. So, a better way.

1. Put the last plank, the one lying on the shop floor, in place on the boat. Mark off where the next plank will land and plane the bevel.
2. Buy, or scounge enough scraps of Mylar that you can tape together a long strip, roughly the shape of the plank, but wider. The joints between the pieces can overlap as much as you want and can be attached with masking or other tape, BUT THE JOINTS MUST BE FLAT. (- no wrinkles or bulges.)
3. Roll up your strip of Mylar, take it to the boat, unroll it and tape it over the space where the new plank will go. It only requires a few hunks of tape. The Mylar MUST LIE FLAT between the bevel of the previous plank and the next ribband. Since Mylar is dimensionally stable it doesn’t take compound curves, it will lie just as flat as the next plywood plank.
4. Standing in a civilised manner on the outside of the boat, make little marks every 4 – 6 inches along the bevel line of the prior plank, and the next ribband. If you want to do both sides of the boat use two different pencil colors.
5. Roll up the Mylar, take it into the shop and unroll it over the next piece of plywood. Using an ice-pick, prick right through the Mylar into the plank stock. Remove the Mylar, clamp a batten around the prick points, draw a line, cut with a saber saw, Voilà a plank!

When it’s time to do another plank erase the x marks and reuse the same piece of Mylar. After a while it’ll have a potfull of stray prick holes in it, but that won’t affect its usefulness one whit. If the plank shape changes as you move down (up?) the boat, you can untape your Mylar segments and put them back together again in a little different alignment. In between uses, roll the Mylar up and stick the end in an old coffee can – try that with 20+ feet of spiling board!

I find I can scarf up quite narrow strips of 12mm ply to get my plank blanks, by aligning them under the Mylar and jiggling them ’til they fit. Other than the garboards, which are wider on this boat, I find I can get two whole planks, a port and a starboard, out of a single 4 X 8 sheet. So it’s economical of material as well as time.


A Stripper Chebacco

Fraser Howell of Nova Scotia reports that he’s just started making a round-bilged Chebacco to the lines of the lapstrake version, using strip planking. Fraser has built a number of strippers, including canoes and a “Catspaw” dinghy, so he’s at home with the technique. He plans to strip plank the hull from half inch pine strips and then cover the lot with a diagonal layer of eighth inch ash (sides) and quarter inch ash (bottom). The whole lot will, of course, be epoxy coated.

Cockpit cover:

One of Chebacco’s great strengths is its huge, deep cockpit. Unfortunately, cockpits in boats of this size can’t be deep and self draining at the same time. A cover is therefore needed to keep the cockpit reasonably dry. If the boat is kept on the water, a cover going over the boom would seem to be the right sort of thing. Brad Story writes:

. . . the ones I’ve seen go over the boom, with snap-up cutouts for the halliards and topping lift. This way it serves also as a sail cover. This cover was secured along the edge of the deck with eye straps. These straps along the coaming would work at least as well. They’d cut down on the cover flapping – though they might chafe the finish on the coaming edge. The cover is over the cockpit only, (though a tail extends fwd and aft to cover the sail). It’s held onto the eye straps with a piece of cord thru eyelets in the cover – a little tedious to put on/take off, but strong and foolproof.

And Finally:

We depend on you to tell us what is of interest, so keep these letters coming. Even if you haven’t started building yet, you must have given some thought to where you want to do it. Will it be in a garage? Or a tent? Or out of doors? Let’s hear your thoughts on these and any other matters of interest.

My address is:

Bill Samson,
88 Grove Road,
West Ferry,
Dundee,
DD5 1LB,
Scotland.

Phone +44 (0)1382 776744 (Home)
+44 (0)1382 308611 (Work)
Fax +44 (0)1382 308877
eMail w.b.samson@tay.ac.uk

Stop Press

Peter Gray’s Chebacco nears completion. It will be launched in Queensland, Australia. Peter has used 9mm ply for the decks in order to cut down on high weight. He plans to install a 12V bilge pump to keep the cockpit dry. He has made his rudder stock from 2″ dia steel pipe which will be galvanised. The mainmast is made from Oregon pine. Will this be the first amateur-built Chebacco to hit the water? Watch this space!