Chebacco News 62 – 11 years and counting, a cedar strip build

Received from Dennis Gamble recently:

I live in Marshfield, Wisconsin, and have been building my Chebacco for about 11 years now.  After completing a Bolger Gypsy back in 2004, I decided I needed something a bit larger.  I did not enjoy the sanding of epoxy required for the tack and tape method, so I decided to build my boat using sawn frames and chine logs instead. 

I first lofted the boat full size in my basement on ¼ inch gypsum board.  I then built the frames, inner stem, centerboard and case.   The frames and stem are of douglas fir. The next step would have been the strong back, but I didn’t have a large enough space to set the boat up at my previous residence.  So the frames and centerboard went up into the garage rafters for a couple of years until I moved into my current home. 

I have a double garage now, about 22 feet deep.  The strongback went up in the right side stall, and the boat has lived there ever since.  My hull is constructed of 3 layers.  The first 2 layers are ¼ inch by 1.5 inch cedar strips laid on a diagonal at 90 degrees.  The outer layer is 1/8 inch meranti plywood.  The hull is covered on the outside with 4 oz fiberglass cloth set in epoxy.  I will not be fiberglassing the inside. In retrospect I would probably have used plywood for the hull, as this is a fairly labor intensive method of construction.  Also, my hull is not as fair as it could be.  This did not become apparent until after I had glassed, painted and flipped it onto it’s trailer.  I will repaint with a flat finish rather than re-glass.  I have been using ½ inch MDO for the cockpit, deck and cabin construction.  All exterior horizontal surfaces will have a layer of 4 ounce fiberglass cloth set in epoxy.  I am using thickened epoxy for exterior glue joints.  I have been using PL Premium construction adhesive for most interior joinery. 

Progress has been slow but steady.  I added a heater to my garage a few years ago, which has allowed me to work through the Winter.  I try to work on the boat a little every day, but probably average only 5 hours a week.  At my current pace, I’m probably 3 to 4 years away from launching.  I haven’t taken many construction pictures, and have lost track of some of the earlier shots, but here are some newer shots.  More shots at https://saildubay.club/boat-building-project/

Chebacco News 29

Chebacco News 29 – January 2000


“Masts and sails not included”

launch2

Jamie Orr’s ‘Wayward Lass’ afloat for the first time

Jamie Orr (Victoria, BC) writes:

Big news day! Boxing Day, 1999, finally saw Wayward Lass launched, albeit as a motorboat. There’s a bit of trim to be added and/or finished yet, but I wanted to get into the water before the new year. For convenience, and to avoid having to flush the engine after, I thought we’d go in at Elk Lake, just outside Victoria. We had quite a bunch of spectators, with both my family and Maureen’s on hand for Christmas. We backed the boat down to the water’s edge, and my daughter Lindsay christened her, smacking the bow with a (plastic) bottle of Sprite, then spraying it thoroughly with the contents. After that, though, complications set in — the boat couldn’t be pushed off the trailer as the lakeshore shelves very gradually and I couldn’t back far enough in. After a quick discussion, we went to Plan B, and drove another few miles north to Sidney where the boat launch can handle much bigger boats than Chebacco. This time all went smoothly, and Wayward Lass floated off easily. The motor started on the first pull, and after a short warm up, six of us went out for the maiden voyage. She goes like a dream. The engine is a 5 h.p. Honda, and I think we must have reached hull speed at half throttle – at full throttle the stern wave just got a lot bigger, made me feel like a BC Ferry. At idle, the motor gradually turns itself to one side, but at anything higher, it stays centred and I can steer with the tiller. We confirmed that the hole for the centreboard pin is indeed at or below the waterline, and had to cut a quick plug to hold the inflow to an acceptable amount. We also found that the ocean squirts up through an empty centreboard case quite easily, at any decent speed. However, both of these were more or less expected, and didn’t spoil the fun. We didn’t go far as the crew found it pretty cold and we were by now behind schedule for the celebration lunch. The recovery was as easy as the (2nd) launch. The trailer was made locally by a welding shop, and they did a great job. I’ve only adjusted the side bunk heights very slightly, and I have make one more small adjustment to raise the roller where the keel starts to rise to the bow. Boat and trailer follow the van so well that I’ve no worries about going anywhere, now. (I’d only ever used a boat trailer once before, about 30 years ago.) She’s back under her shelter now, waiting for the finish work I mentioned, and her sailing gear. I’ll be going as hard as I can on those now, except for the good weather days when we go for a power cruise! Chebacco’s rule!

Jamie also has advice on raising the Chebacco to get the trailer under it:

slings1

‘Wayward Lass’ in webbing slings

Jamie writes:

We put the boat on its trailer last Sunday, December 19. My dad (85 years old) and I (an aging accountant) managed the job ourselves, much to my surprise, without jacks or other lifting gear. I’ll describe in case it might help someone else with the same job. The boat was supported by three crosswise 4 x 4’s, resting across two lengthwise 6 x 6’s, with the bow and stern firmed up by separate supports. We started by knocking away the bow and stern supports, then I was able to lift up the ends, while Dad repositioned two of the 4 x 4’s about 3 feet apart, either side of what we guessed was the balance point. (Which is, I think, about a foot behind the midships bulkhead.) Then, as I lifted up each end (now quite light) in turn, Dad built up a criss-cross tower under the boat until it was almost 2 feet off the ground. The wide keel was enough to keep her balanced, although we had a strap under the bow end for insurance. After all, if she tipped, I’d have lost the boat, and either my canoe (stored on one side), or my dad (crawling around on the other)! More about the strap in a second. Once we had the boat up high enough, we still couldn’t roll the trailer under her because of the supporting tower of 2 x 4’s and 4 x 4’s. So we built up a pile of blocks, bits of wood and wedges under the tail of the skeg, and supported the bow with the strap, which was hung from a gigantic saw horse sort of affair across the foredeck, about a foot and a half or two feet above it. This saw horse is a 2 x 12 plank with 2 Black and Decker metal brackets, designed to accept 2 x 4 legs, and easily adjusted for height, length, width of plank etc. Very useful brackets, but I’ve no idea what they’re called or if they’re still being sold. The strap itself was seat belt webbing, wrapped 3 times around the plank and tied with a couple of half hitches. We pried the bow up an extra inch with a lever to try to allow for the stretch of the webbing, when we tightened it for the last time. We were then supported front and back, so could take the tower out, and remove the remains of the cradle. The trailer now ran in under the keel quite nicely. Once we had it positioned, I untied one end of the strap, and let the bow down. I had to take off one wrap, the remaining two provided enough friction to control the bow on the way down. Then we lowered the tongue of the trailer until the support under the skeg could be removed. The boat was then completely on the trailer.

Comfortable sleeping arrangements

Bob Branch writes:

Bill:

Hey, Merry Christmas from Michigan! I just read the comment in vol 28 about one owner buying an airmatress and pump. THERE IS A BETTER WAY!!! And it eliminates the pump (a special peeve of mine in semiwilderness camping). The solution is the self inflating air mattres. “Camprest” is the primary manufacturer and they are available in a variety of lengths and widths from backpacking and camping goods stores. And they are indeed self inflating. The “deluxe” versions are about 2 inches thick and lest anyone think that will not do the job, I’m here to tell you it doesn’t matter if you are sleeping on rocks or limbs, you will not feel the ground. They roll up into a roll that stores very easily. When they are inflated I adjust mine by adding a puff or two of air just so when I am rolled on my side my hip bones do not bottom out to ground. They have a layer of open cell foam in them as well as the air and besides being comfortable absolutely provide total temperature isolation from what is under you. In winter camping almost no heat loss occurs into the ground! We use them on the boat as sunpads. The 25 inch wide version is wonderful if you have the room for it because when you roll over you do not roll off. Owners should check the width of their floor space. A back saving addition is an overcover that forms the “Crazy Creek Chair”. This is a cover over the pad slides into with a few straps and a few battens that allow the pad to become the most comfortable rocking chair ever created. It can be adjusted to firmness, angle, and I don’t know how to explain how many more ways but it provides you with absolutely as much back support as your reclining rocker at home. It is wonderful after a day of no back rest on a wilderness canoe trip to lean back into one of these things and rock the evening away. On my canoe trips I have to be sure to have the tent up and camp totally made before sit into mine cause often I’ll doze off before dinner even gets made. These things will absolutely allow a wonderful night’s sleep on a rock hard surface…. and ply and epoxy sleeps that hard. Ain’t we all been there, done that, bought the tee shirt?

Bob Branch

Reassurance from Phil Bolger & Friends regarding Chebacco anxieties

Dick Burnham writes:

I wrote to Phil Bolger on some of my lingering concerns about the Chebacco and he swiftly put them to bed. I just received his letter today and rush to let you know about it. You must, though, if you’re inclined to publish some of the comments below, gain Bolger’s permission before doing so [Done that – No objections from Phil.]. For me they are comforting and offer me guidance on those things that have perplexed me some. For other, I have no way of knowing.

Maybe this is old hat for you guys. On my concern about flotation in the event of a capsize: “We’re not aware that any Chebacco has capsized. It would take a combination of very rash handling and bad luck to do it. The boat is unsinkable as designed. Any added buoyancy will float her higher if flooded.” (If you recall, Bill, I was wondering about sealed compartments and/or auto innertubes half blown up fore and aft….)

On my interest in possibly providing cross-planks to span the cockpit from seat to seat thus creating a nice sleeping platform outside: “Flush panel over the foot well is reasonable but its stowage needs study.” (My thought was to have 6 planks some 3′ long and a bit over 1′ wide so that the sum would cover from cuddy hatch aft to tiller. 3 would store under an openable seat on each side where the centerboard well is located — keeping weight low and in the center when sailing.)

On sailmaking and shaping of the sails: “We hear that the Sailrite Kits for homesewn sails are very satisfactory. Urge any sailmaker to build a deep draft into the mainsail. Too-flat sails are too common and degrade performance of gaff-rigged boats especially.” (Sailrite is “sailrite.com” on the internet and when I visited them some time back their graphics indicate cut, canvas weight, and price for mains’l, mizzen and an optional jib along with fixings such as thread that will be needed.)

He ends with a short note indicating that consultation on plans purchased from others (mine come from HH Payson) is “very limited.” I appreciate that as the price was most affordable. Yet it was a very nice consultation, indeed. [In his letter to me, Phil adds “Policy on consultation is to do the best we can to keep correspondence from biting too deeply into design time; that is the answers may be a bit abrupt at times.”]

Oh, found and instantly bought an 8′ long Papua New Guinean paddle. Wonderfully carved blade, and the whole length of the paddle from one piece of wood. The length will suffer a slice through it on a lengthy diagonal when we pack up to go home, but I’m thinking it will make a nice poling paddle when rejoined with epoxy, and with a boat or gaff hook on the upper end it might be a pretty useful memento.

Best, Dick Burnham


‘Itchy and Scratchy’ goes from strength to strength


iands

‘Itchy and Scratchy’ flying along on a close reach

Fraser Howell, of Nova Scotia, continues to enjoy sailing his strip-built Chebacco and has had considerable success with a large jib attched to a longish bowsprit. He tells me that he’s currently making a replacement hollow mainmast, using the ‘birdsmouth’ type of construction that was written up in WoodenBoat magazine #149, 1999.

Old-style Chebacco Boats

Craig O’Donnell draws our attention to a picture of historical Chebacco boats at http://www.photolib.noaa.gov/lb_images/historic/nmfs/figb0080.htm

Craig’s own pages are, incidentally a fantastic resource for all things boaty – http://www.friend.ly.net/~dadadata

And finally

Bill Samson can be contacted on : bill.samson@tesco.net

Chebacco News is at http://members.xoom.com/billsamson

Snail mail to Bill Samson, 88 Grove Road, Broughty Ferry, Dundee DD5 1LB, Scotland.

Chebacco News 10

Chebacco News


Number 10, July 1996


‘Sylvester’ hits the water!

ch101
Bill Samson names ‘Sylvester’

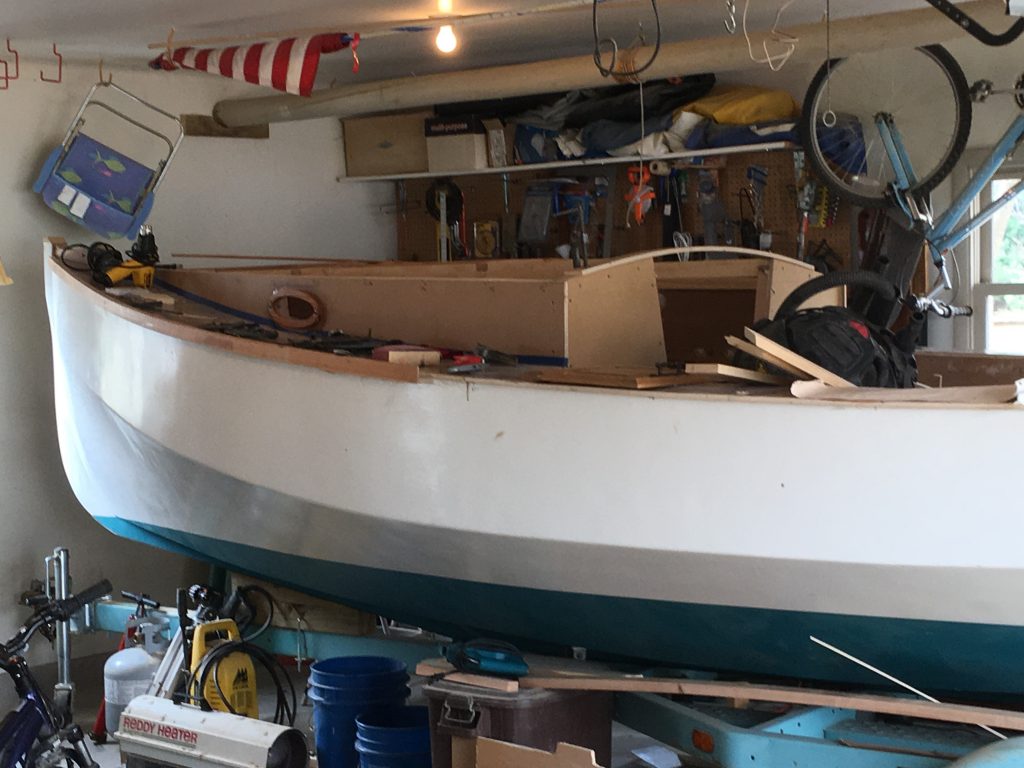
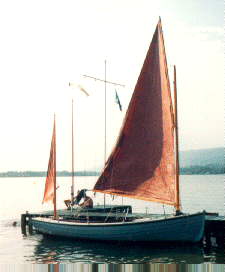
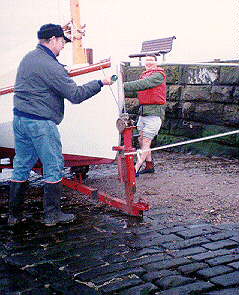
Your editor’s sheet ply Chebacco-20, ‘Sylvester’, hit the water for the first time on 6th May 1996. This is the first Chebacco to be launched in the UK and is now nodding at her mooring in the Tay estuary, here in Bonnie Scotland. “Why ‘Sylvester’?” I seem to hear you say. (Or, possibly, “What a bloody awful name for a boat.”) Since the Chebacco is technically a cat yawl, and catboats are almost non-existent on this side of the pond, I decided to call her after a well-known cat. My tender, when launched will, of course, be ‘Tweety Pie’. I’ll now bore you with some excruciating detail.

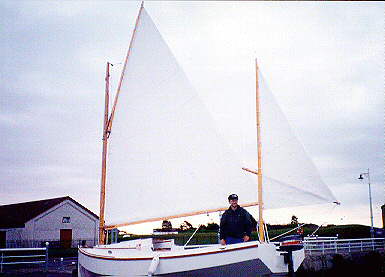
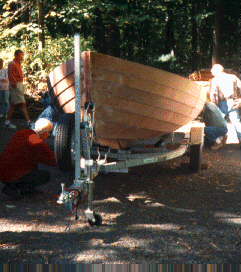
It’s always been a worry to me that she might not get out of the garden. I’d made models and tried it out with them, but it was never clear that it’d get around the dogleg by the garage. I planned to hire a crane to lift it over the garage, but when the crane arrived, it was 4” too wide to fit down the drive. After a couple of nights tossing and turning I got a rusty old dinghy trailer, with collapsed suspension, and moved bits of it around so that the Chebacco might fit. She did fit, and was even nose heavy when I put some junk up for’ard in the cuddy. She JUST made it past the garage (an inch to spare) with help from my glamorous assistants, Sheila and Esther. Since the trailing arrangement didn’t quite meet the letter (or even the spirit) of the law, I decide to launch when traffic was minimal – at 5 am. Three friends, Louis, Donald and Paul were mad enough to get up at that ungodly hour to help. I trailed her down to the harbour (just a mile from home) without incident, at 5 mph. I drove back home for the tender (a very heavy 15 foot skiff) and spars, sails, outboard etc. The mast was raised (Phil’s slot works well) and gaff, boom, mizzenmast and sails were put in place. Everything was raised on shore to make sure the ropes weren’t tangled up.

ch102
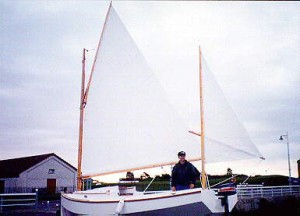
Sails up on dry land.

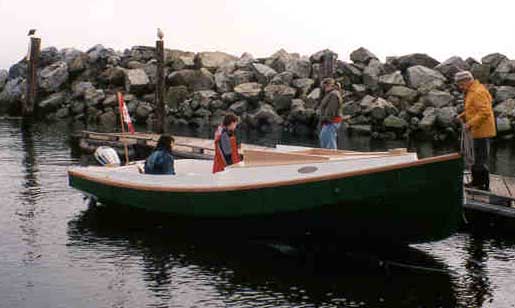
She slipped quietly into the water and we moored her in the harbour temporarily:

ch104
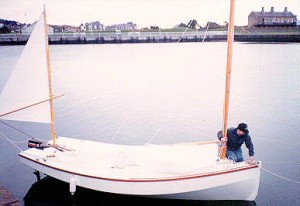
Moored in the harbour at Broughty Ferry, Scotland

We then motored upriver to my mooring (which had been prepared previously) hooked her on and nervously left her to it.

First impressions:

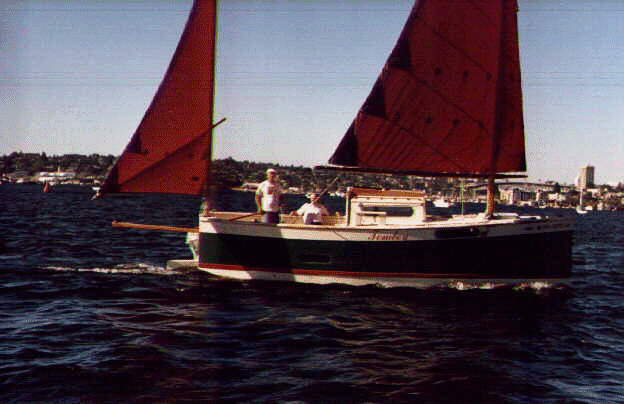
Several of you have asked me “What about the weather helm?”. I am happy to assert that it hasn’t been a problem for me. I’ve been out sailing in ‘Sylvester’ nine times to date, in conditions ranging from flat calm to force 5. Weather helm only becomes noticable when she heels a lot. When I’ve had a crew sitting on the weather side with me this has never happened. Sailing single-handed she begins to heel uncomfortably under full sail at about force 4 and the answer is either to spill wind or take in a reef.

On the wind she points high and makes good progress to windward. I’ve sailed in company with ‘Wayfarer’ dinghies and do as well as them to windward, and somewhat better off the wind. I’ve even sailed alongside a 25 foot (heavy) Bermudan sloop and did better in a force 2/3 wind. I daresay the sloop would have done better in a heavier blow.

For the record, my mainsail has maximum draft about 30% back from the luff and the mizzen is cut dead flat.

Downwind, some concentration is needed in heavy weather to keep her running straight. Her performance is exhilarating when surfing down good sized waves! She has little or no tendency to roll when in a dead run. Gybing is straightforward and gives me no anxiety (even when it is accidental). On the wind, she tacks like a dinghy; with no tendency to stick in irons.

A New Chebacco?

Phil and Susanne wrote to me a few weeks ago:

How much interest do you suppose there would be in a “cruising” version of the Chebacco, with a longer cabin, a shorter cockpit, and a raised deck for more space inside and more reserve buoyancy? . . . It seems offhand to be workable without major changes in the class.

My own view is that the ordinary Chebacco-20 suits me nicely. A nice big cockpit for lots of folk daysailing is worth more to me than a seldom used roomier cabin. On the other hand the big cockpit is a pain in that it isn’t self draining and so I need to fit a cover over it whenever I leave the boat on its mooring. Room in the cabin is adequate for a short-arsed individual like me though I can see the attractions of more head-room and possibly room for cooking, reading charts, permanent potty site and so on. Nevertheless, if I was starting over I’d still go for the sheet ply Chebacco-20.

In order to quickly sound out a sample of Chebacco fans, I sent an email to some of you for your reaction. Here are some of them, in no particular order.

Gil Fizhugh writes:

I think Phil’s proposed cruising Chebacco would be an improvement.

The main drawback of the 20-foot Chebacco now is that they’re awfully cramped for those of us who aren’t “short arsed” [Gil is quoting my own description of my stature back at me – B.S.]. Joan used to enjoy camping. She hasn’t done any since she’s known me because I’m turned off by the whole idea. I’ve thought it might be fun to spend a night in the Chebacco once in a while, dry under the roof and with a potty close to hand. I wouldn’t have to lug my sleeping and cooking accommodations to where I was going to use them, on my back. But the Chebacco cabin is going to be awfully tight.

If the 25-foot plans had been available when I started, I probably would be building it now. I presume the materials would cost 30% or so more, including a bigger engine. Spread out over the number of years I’m managing to fritter away on this project, that’s not a big deal. (If I had to add 30% in a lump sum on top of the already high cost of having a Chebacco commercially built, it would be a very big deal indeed!) The 25-footer has the reserve buoyancy and enough cabin space for two tall people to be comfortable – well, almost. There remains one major problem with the 25-footer: it’s beyond the size and weight that can comfortably be towed by an ordinary car. My boating suddenly gets much more expensive if I have to buy, feed and maintain a Ford Explorer for 100% of my driving, because the Subaru can’t do the job in the 5% of my driving that’s done with a boat on the back end. Not many family cars weigh 2 1/2 tons and have 6-liter V-8’s any more.

So the proposed boat would be roughly a 20-footer with the cabin space of the 25, the sacrifice being a small cockpit instead of a small cabin. This would be a 2-person boat (or singlehander) all the time, because daysailing with more than two adults in a little aft cockpit would put too much weight in the tail, wouldn’t it? Still, if I were starting over, I think I’d prefer such an option – a boat well- balanced for sailing and camping for two, rather than great for sailing for six but cramped for camping for two.

I’m curious about what Phil means by a “cruising” version. If he just means one that’s comfortable for more than one night on board, the proposal is an improvement. But what’s the extra reserve buoyancy for? I hope my boat will be adequately buoyant for sailing in Maine, Cape Cod, the Chesapeake, . . . Is the new one to be an offshore boat? Through the Gulf Stream to the Bahamas? Still an unballasted gunkholer? I shall try to open my mind so Phil can pour his genius in.

Best regards,

Gil

Fraser Howell writes: Bill, I agree with you. I like Chebacco as a “camp cruiser”. I don’t like the boxy version of the Chebacco that was shown in P. B.’s latest book, although I have been thinking about a self-bailing cockpit, but that would be a later modification.

Brad (NADER2@delphi.com) says:

This sounds like a good idea to me at least. I think if I could only have one boat I’d rather daysail a cruiser than cruise a daysailer.

Jamie Orr writes:

. . . my first reaction is “no thanks”. I think this is because the current version is close to my idea of the perfect boat. Any design is a host of compromises, and I like the choices already made. These are (not in any order of preference):


  • Trailerable – light with no ballast, shallow keel, not more than 20 feet overall.
  • Shallow draft for ease of landing on interesting beaches, islands.
  • Big cockpit – that’s where most of the time is spent – I won’t give that up.
  • Simple to rig – no standing rigging certainly meets that one!
  • Simple and relatively inexpensive to build.
  • A place for the crew to get out of the rain. I feel the boat already has the ability to cruise if helped
  • out by a boom tent or tent ashore. If two can cruise comfortably for 10 days in a 16 foot canoe, a
  • Chebacco should be palatial, even for four. (Mind you, the raised deck sounds like it could be a good
  • idea.)
  • Good looking – the lines caught my eye back in 1991, and I still find them attractive.


Right now I’m still building my Chebacco, so most of my likes and dislikes are based on prejudice, not experience. We like camping, so a minimal approach seems right. Otherwise for serious cruising I would probably look for a larger boat altogether. In that case I would go the whole hog and look for an enclosed head, galley arrangements, and four berths below. I would probably charter a boat like that once a year, and keep the small boat for daysailing the rest of the year.

If I was to dream about a cruising Chebacco, I would abandon the 20 foot limitation – how about a 30-footer with the same proportions and sail plan – maybe an inboard engine, a self-draining cockpit if it could be done while keeping that sheerline . . .

Of course, I’d have to dream up some added cash, too.

Jamie Orr

Bill Parkes says:

What prompted PCB to propose the cruising Chebacco idea? It strikes me as an excellent notion. I very nearly fell for the glass-house version. There is, I think, more cockpit space than I would ever need in the Chebacco-20.

What is he proposing?


  • conventional plywood or lapstrake?
  • long ballast keel (like the glass-house version)?
  • a cabin configuration like the 25?


Happy sailing!

Bill,

Harrisburg

So there we have it. We await developments with interest . . .

Who’d be a boat designer?

Chuck Merrell of Seattle reads Chebacco News. He lives aboard a ‘Jessie Cooper’ that he built himself and is thinking of getting into the boat design business. Reading his letter makes me appreciate what Phil has to put up with! Now read on . . .

Hi Bill,

Having inserted a toe into the idea of the design business (after telling myself I’d never do it), I’ve grown to believe that Phil’s policy of having an unlisted phone number might be a stroke of genius. Ted Brewer also went through an un-listed phone period lately.

As late as yesterday, I had a meeting with a potential dinghy plans customer, and the conversation went like this:

Him: “Gee, that’s a neat design, I’m gonna build one . . . but whatja put that keel on it for? I’d build in a centerboard if for no other reason than the trunk would support the athwartships seat for my girlfriend, and other seats so I could haul me and two others to the beach from my cruiser, you know drink beer, toss a shrimp on the barby–all that.”

Me: “Well, the idea behind this dink is that it is to be sailed primarily by oneperson, and you’re supposed to sit on a cushion with the inside of the boat uncluttered so you could move around and it would be easier to sail–not to mention lowering the center of gravity by sitting in the bottom on a soft cushion.”

Him: Well, it looks pretty light . . . but I’ll bet that if I put my 25 horsepower Evinrude on the transom that sucker’d really really fly, maybe twenty or twenty five huh?”

Me: ” Not really, the bottom of the boat is designed for sailing speeds, and the aft sections are prismatically correct for lively go-fast performance and helm stability particularly on a down wind run.”

Him: “How fast is “go-fast”?

Me: “Well, even though the boat is only seven and a half feet long, you could probably get six, seven knots under good conditions.”

Him: “God, that’d take forever to get from where I anchor in Mystery Bay to the store for a beer run. Maybe I just ought to just buy a Livingston. They don’t row very well, or sail very well, or tow very well, but they’ll handle three grown-ups (!?) and two racks a’ beer with three or four inches of freeboard, and still make 20 knots with my 25 Evie. Still . . . those Livingston’s are pretty pricey . . . I bet I could build yours for a hundred bucks if I could get the plans for ten bucks or so, whadda ya say”?

Me: (Mentally filling out an Employment Application for the shoe store down the street) “Well, actually, I don’t really think this is the boat for you, but why don’t you ask about Livingston’s at the office. I think they have a couple used ones you could get really cheap”.

Him: (Heading for the door) ” Wow! Really? Terriffic! Great! Glad they sent me over! They told me you really know what you’re talking about! Hey, gotta check that out . . . maybe a lee board, you know one of those snap on kind like on a Livingston might be better than that keel, though. I know about this design crap. I been ‘bashin’ the Sound since you were in diapers. Catch ya later!”

**Fade To Black**

Bottom line: I’m not sure that hostile criticism from those in the diaspora stands up especially in reference to a “trial baloon”. The war waging inside me right now is: “If I were going to do this stuff for profit, should I (like 95% of the other designers) meet plan buyers at the door with sheep shears, suffer the inevitable lumps with aplomb and have a much better looking exchequer at years end?

Chuck

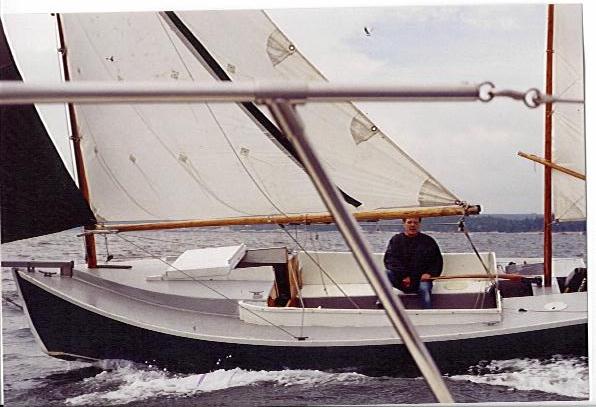
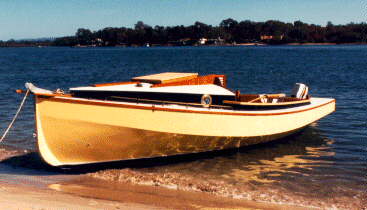
Photos from Australia:

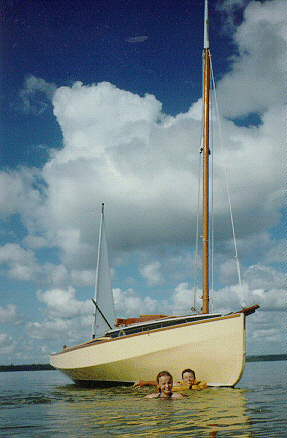
Peter Gray has sent me some photos of Gray Feather, which is now fully rigged. He reports that he is very happy with her sailing performance, especially in heavy weather.

ch107
Gray Feather as a swimming platform?

ch108 
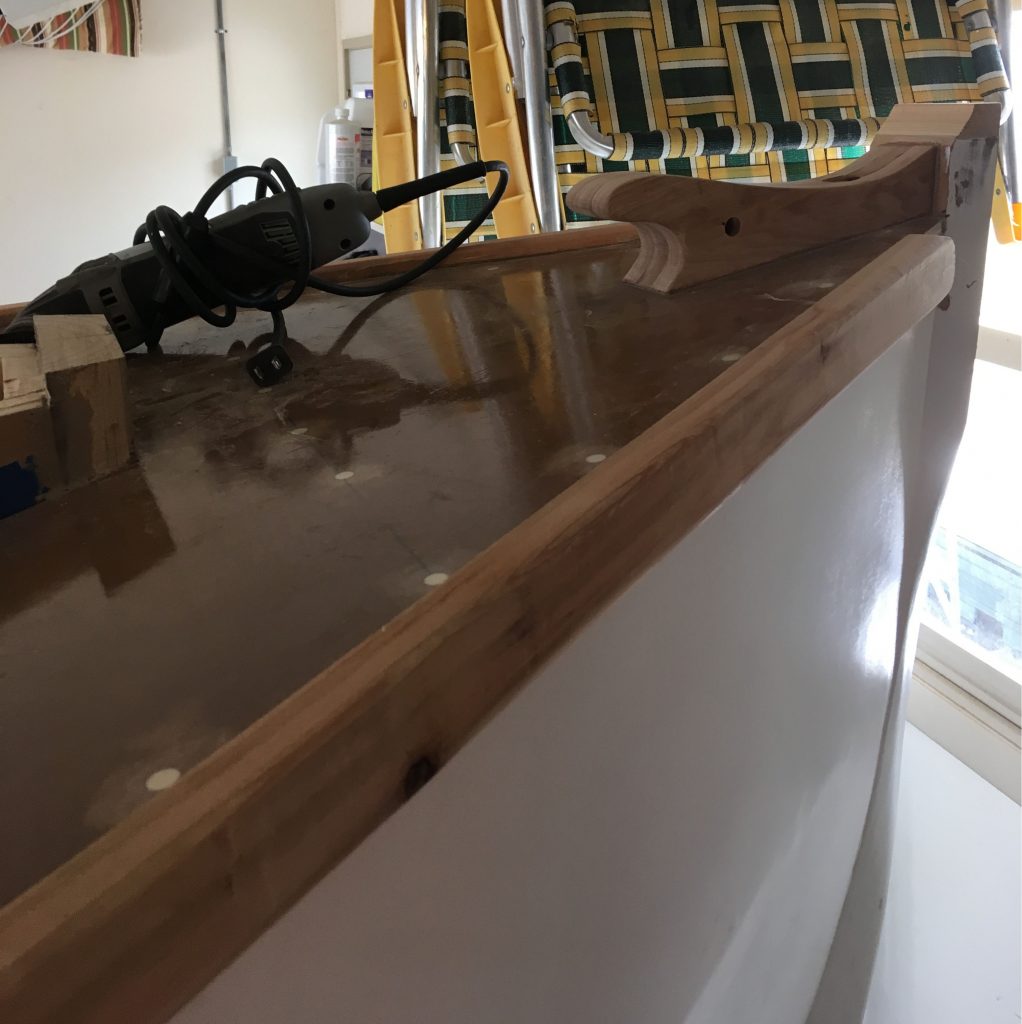
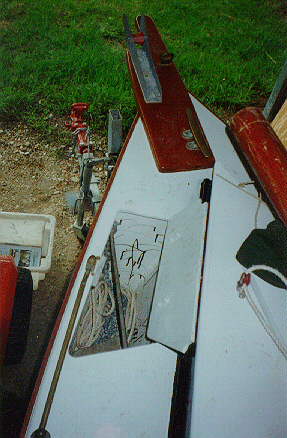
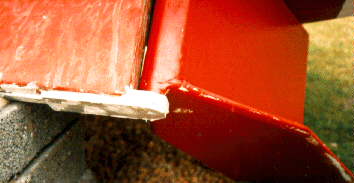
Peter has put a box for the anchor under the side deck.

Stop Press: Peter entered Gray Feather in the Sandgate Gaff Vintage regatta and was placed 7th out of 19 boats (on handicap).

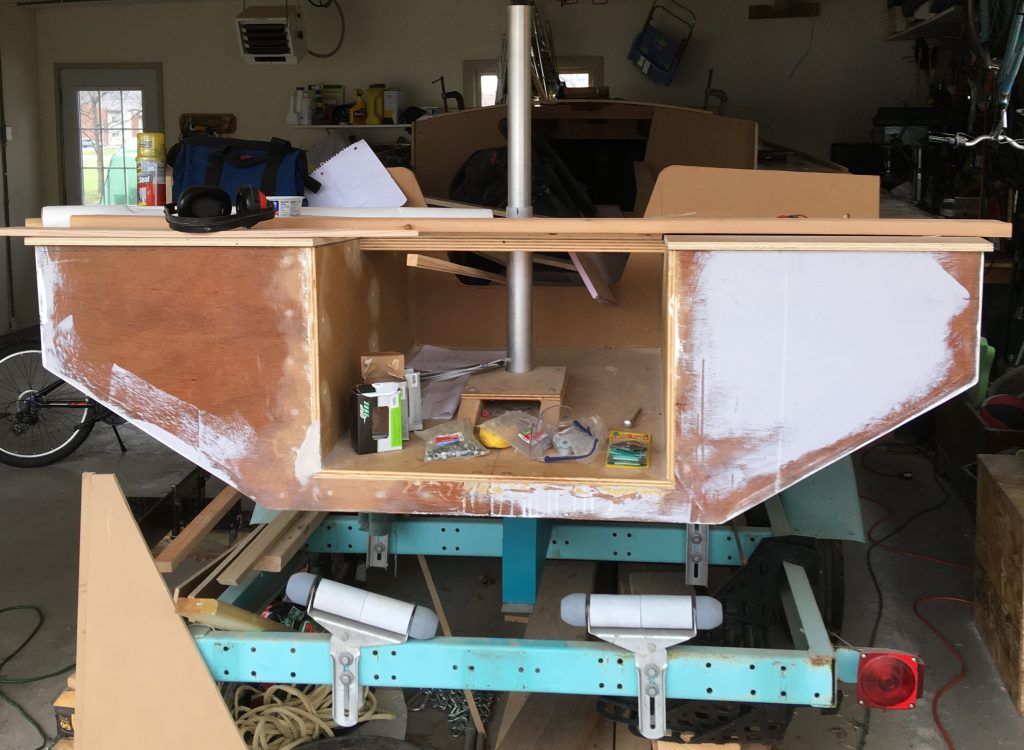
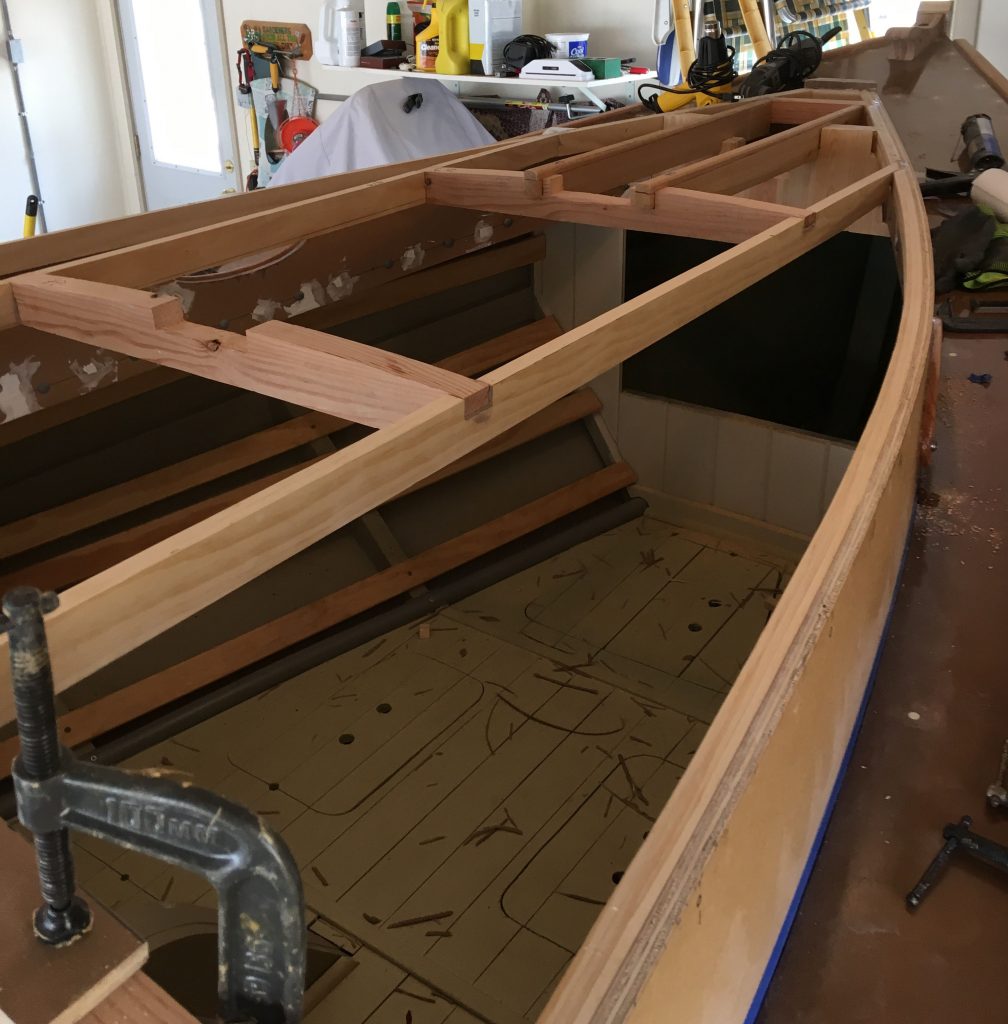
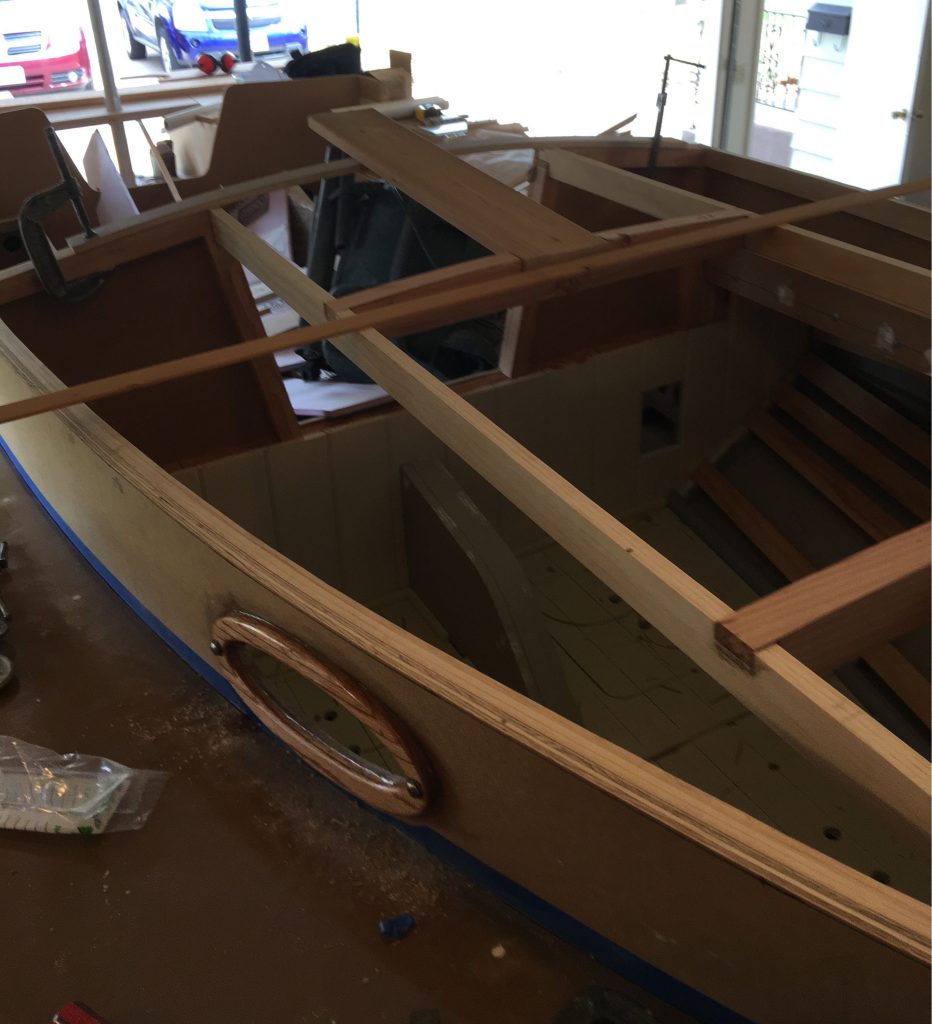
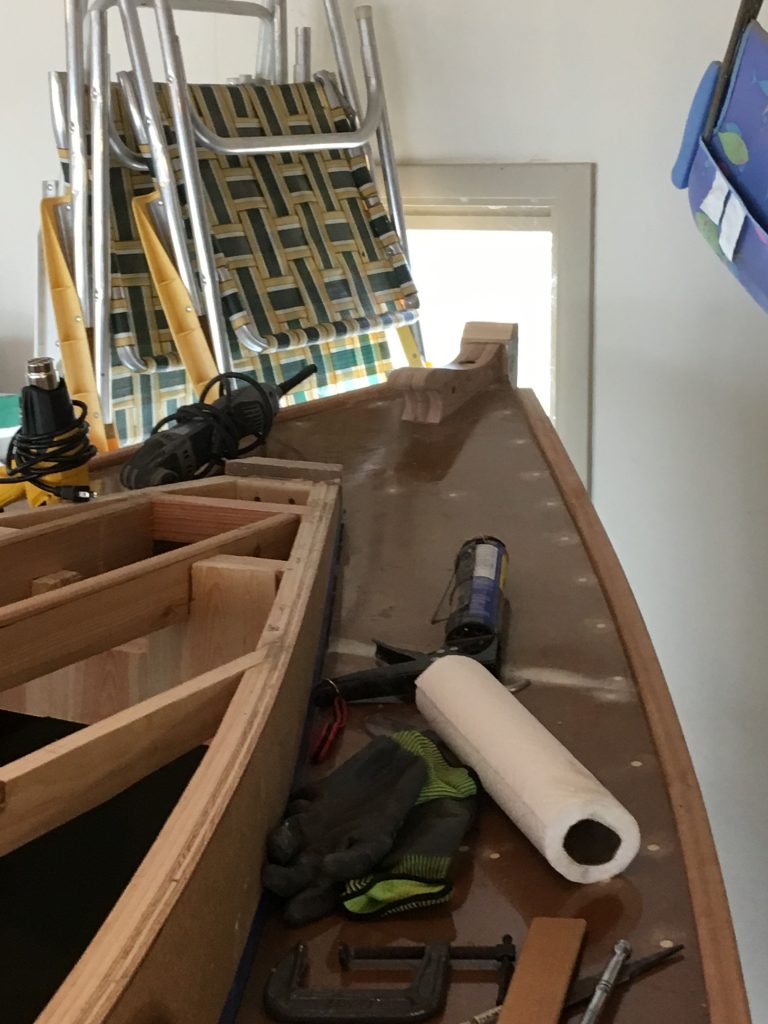
And from Canada . . .

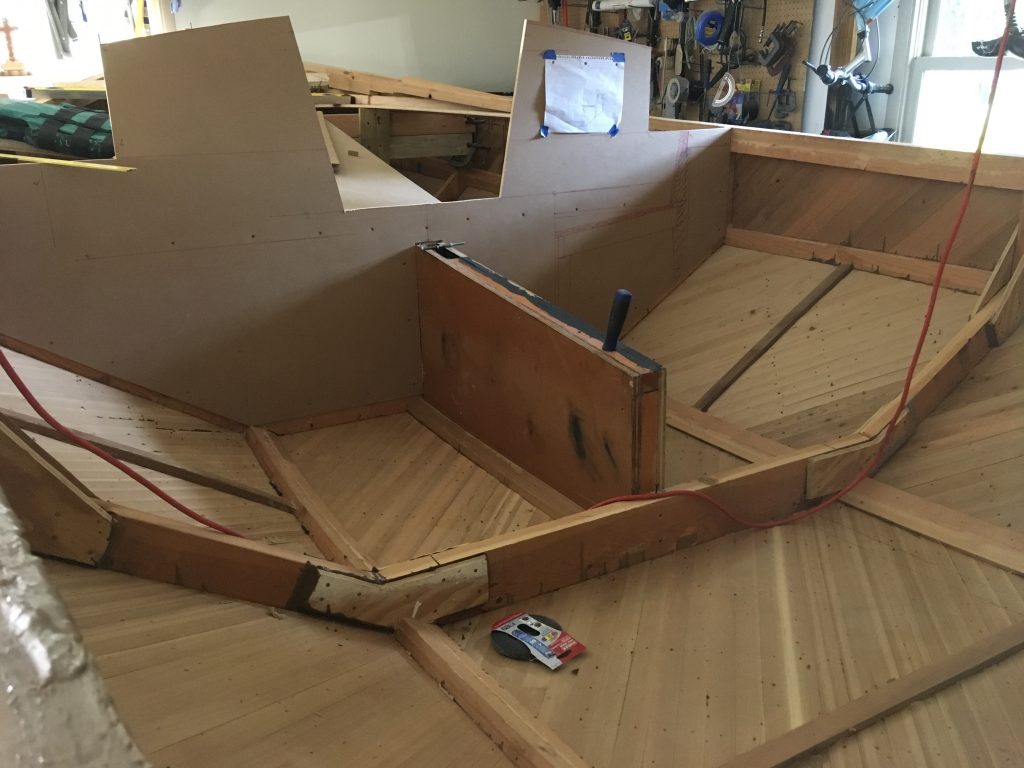
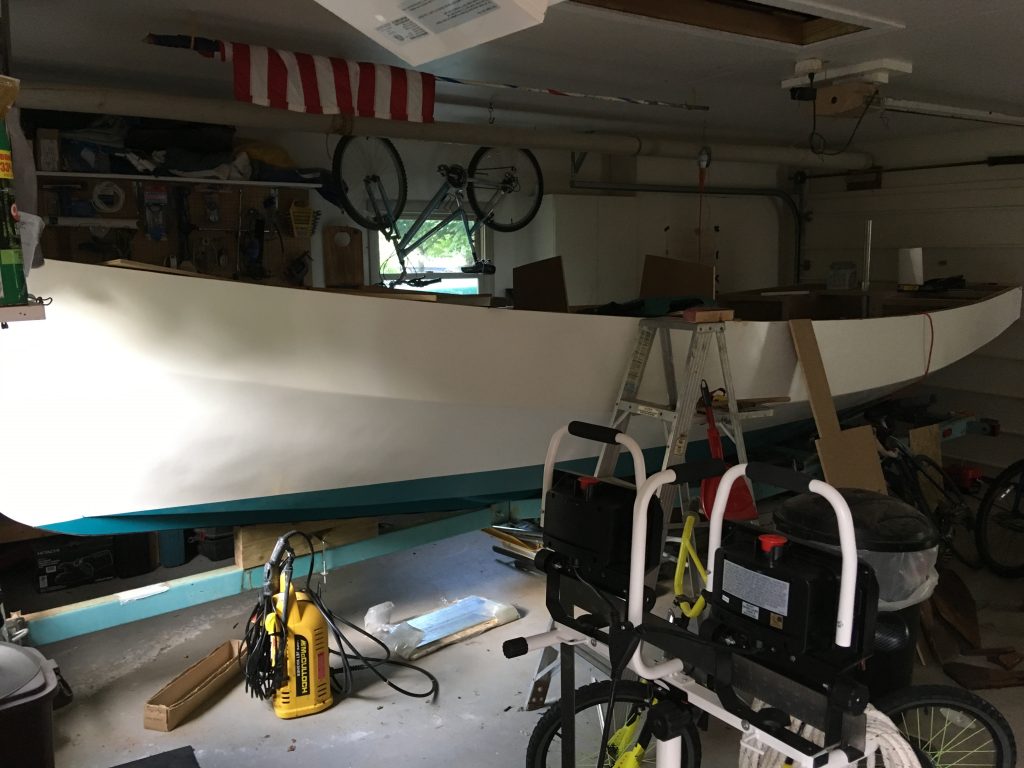
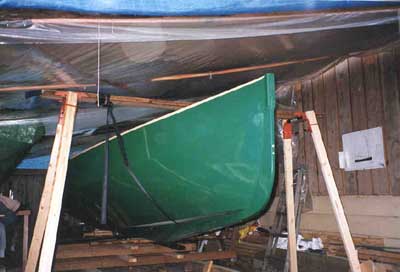
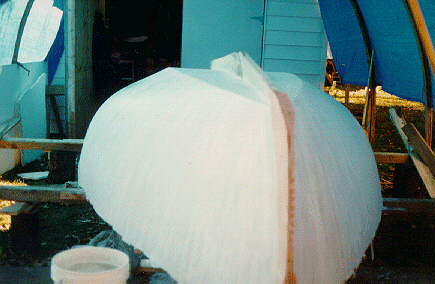
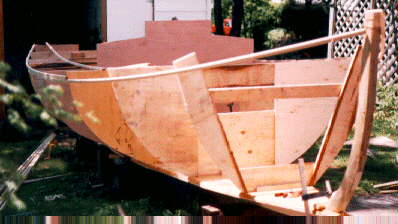
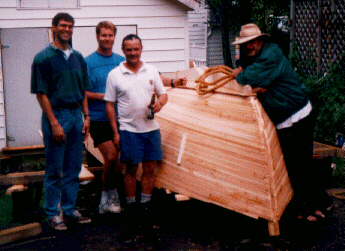
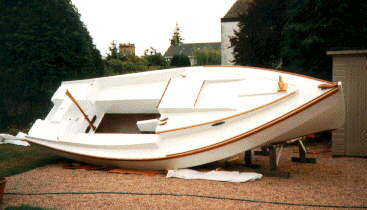
Fraser Howell is making excellent progress with his strip-planked Chebacco. She’s strip planked in half inch fir, with 1/8” ash veneers epoxied over the strips and sealed in epoxy:

ch109
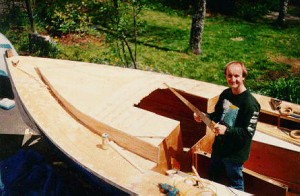
The coachroof is strip planked and veneered

ch1010
Fraser’s strip-planked hull has been veneered with ash

ch105
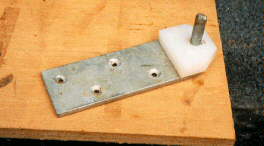
Fraser’s rudder is welded up in aluminium

Stop Press (27 June) – Fraser plans to launch any day now!

And finally . . .

That’s all for this time. You may have noticed there’s been a longer gap than usual since last time. I can really only print what you send, and since there’s been little news, I’ve not had much to put in. PLEASE send me your news to ensure bumper issues in the months to come.

Bill Samson, 88 Grove Road, West Ferry, Dundee, DD5 1LB, Scotland. w.samson@tay.ac.uk 1

Chebacco News 06

Chebacco News

Number 6, November 1995

Peter Launches!

Peter and Sandy Gray, of Queensland, Australia, have launched their Chebacco. As far as I can tell, this is the first amateur-built Chebacco to be launched. (If anyone knows this to be wrong, please let me know!) Congratulations to Peter for a great achievement.
six6
Gray Feather afloat in the Noosa river.

Peter writes:
Dear Bill,
Well, it has finally happened. Our boat was launched on 31 August 1995.
It was a beautiful morning on the Noosa river as our boat slid off its trailer and into the water. She sat exactly on the waterline and looked a picture. I stood back to take a photo of her but our camera wouldn’t work. At that moment a person walked down to admire her and after seeing that our camera didn’t work, he offered to take some photographs for me (- he was a professional photographer). After the photos were taken, Sandy and I boarded the boat and motored off down the river.
. . . the sails will come later. She has an 8 hp long shaft Johnson outboard. I estimate that she cruises at about 6 kts comfortably.

Bill travels and Gil flips . . .

I was fortunate to be in the USA on business at the start of October and took some time off to visit Gil and Joan Fitzhugh in New Jersey, and Bill and Mary Parkes in Pennsylvania.
Gil kindly timed the ‘flip’ (ie lifting his hull from the molds and turning it right way up) to coincide with my visit. A host of neighbours and relatives turned out for the flip and they were fuelled by generous quantities of grog and grub supplied by Gil and Joan. The flip went without a hitch – apart from participants having to dodge acorns falling from 100 foot high oaks around the boat. I was particularly impressed that the hull lifted off the mold without a murmur – no screws had been left in; no glue had stuck the hull to the molds.
Gil’s hull is beautifully fair – the product of more hours of sanding and filling than I care to imagine – and the plank lands are sweet and fair to the eye. Now for the fitting out . . .
six9
Gil Fitzhugh’s hull safely flipped and on its trailer.
Bill Parkes travelled from Mechanicsburg to assist in the flip. I went on to spend a couple of days with Bill and Mary. Bill is planning to build a sheet ply Chebacco. He has already built two Bolger boats – a Nymph and a Gloucester Light Dory. He took me rowing in the Light Dory on the Susquehanna river. Having rowed and admired it, I can understand why it is called Phil’s ‘ticket to Heaven’.
Sincere thanks to Joan, Mary, Gil and Bill for their kindness and hospitality to me during my visit, and particularly for allowing me to OD on boat talk with them!

Want molds for a lapstrake Chebacco?

Now that Gil Fitzhugh has completed his beautiful hull, he has a set of molds that are now surplus to his requirements. If you are planning to build a boat like Gil’s, you are welcome to take away his molds, free of charge, also saving yourself the hassle of lofting the lines full size. Gil would rather they went to a good home than put them to the torch. You can contact Gil at his home in New Jersey:
Mr Gil Fitzhugh,
Primrose Trail,
Mt. Kemble Lake,
Morristown,
NJ 07960

e-mail: joancarol@aol.com

phone: 201 425 9010

Chuck Merrell on Anchors

six10
‘Tomboy’

Chuck Merrell of Seattle lives aboard ‘Tomboy’, a ‘Jessie Cooper’ designed by Phil Bolger, and is currently finishing ‘Wonky’ a steel ‘Tahitiana’ ketch which he bought half-built. Chuck is a self-confessed anchor-obsessive and emailed me with the following observations in response to the chat about anchors and how to stow them in Chebacco News #5:
Hi Bill, I usually singlehand, and even if there is someone with me, I generally wind up doing most everything by myself anyway. Singlehanded anchoring is always a problem if you have to leave the tiller to drop the hook, especially on a boat like Tomboy. Wonky wouldn’t be such a bad problem, but anchoring from the bow still takes a thirty foot run from the cockpit to the front end and back.
On Tomboy, I keep the anchor permanently mounted on the stern, and keep the anchor chain in a bucket in the cockpit. (I use 30′ feet of chain). I have the chain shackled to the nylon anchor rode which is led back to the bow, through the chocks and cleated off. When I’m ready to anchor, I have made up a little quick release device that allows me to drop the anchor out of its mounts as the boat is moving forward. I hold the chain bucket overboard so the chain doesn’t flail against the boat as it runs out. The rode follows the chain and the forward motion of the boat digs the anchor in and turns the boat in line with the anchor, then it can be backed down and set and adjusted at my leisure. The system works great, and you don’t have to leave the tiller during any part of the operation. I’ve done it dozens of times, and never have had a mishap under power or sail, regardless of how hard the wind is blowing or what the conditions. The way I have the anchor mounted makes it very easy to deploy, and the anchor always stays put even in heavy weather till it’s time to let it go.
That brings up the subject of what kind of anchor to use. According to what you say, Phil has recommended a 25 pound Plow, or an equivalent Bruce. Phil as you know is a “belt and braces” man, particularly when it comes to anchors. In my opinion, a 25 pound plow is almost 3 X overkill unless your local conditions absolutely dictate the choice. This anchor is better suited to a boat weighing about 6,000 lbs, not a daysailer less than a ton. A 25 pound plow is about the smallest you can buy, and Phil probably recommended it because he figured any Scotsman worth his Haggis would want to spend the money at home with Simpson Lawrence. I don’t like to use a plow unless I have a bowsprit and winch. They are heavy, and it’s easy to bang the topsides and pinch your fingers. A 25 pound isn’t too bad, but on a pitching foredeck, my 45 pound can really smash a pinkie and make dents in the topsides or deck. (I’ve designed Wonky’s bowsprit and rollers to work in such a way that there is no way raising an anchor will bang into the hull regardless of the conditions. You’ll see when I get the pix developed and scan them to you.)
Bruce anchors are nice in certain types of bottoms, and they don’t foul easily, and will reset in their own length if they drag. But they’re pretty expensive, and in general don’t perform much better than a Danforth type, especially to anchor a light boat like the Chebacco. Danforths and Bruce anchors are roughly for the same type of bottoms, but the Bruce is harder to stow.
I think that I would use an 18 pound standard Hi Tensile Danforth (assuming that a Danforth type will work in your ground conditions) with 30 ft. of 5/16″ BBB chain as my working system on a Chebacco. One thing is, with that setup, you could sit around and wonder if the anchor was holding the boat, or could you just get by with chain only (just kidding). A 1/2″ nylon rode would be nicer to hand, but 3/8 nylon would be plenty strong enough. A Danforth can be made to hang on a flat vertical transom like the Chebacco has. If you use the natural design of the Danforth, the flukes will fall away from the boat when stowed, as well as deployed, and never cause marring. You can use a second 18 Lb Danforth on a Bahamian mooring arrangement if you anchor in the river. You can leave the anchor rigged and hanging in its bracket when you are tied to your mooring, or when trailering down the road. This is a good system if you ever really need to anchor fast.
For comparison, on Wonky which weighs 20,000 lbs, I have the following ground tackle: 50 Lb Herreschoff, 45 Lb Plow, I built the following anchors: 40 Lb Danforth type, Two 40 Lb large fluked folding Yachtsman anchors, 18 Lb. Kedge, 5 Lb Kedge. 200 ft of 5/16 Hi-tensile chain, 200 feet of 5/16 BBB chain (given to me as a gift), and a couple dinghy anchors. For storm conditions I would becue the 50 Lb Herreshoff and the 45 Lb Plow. For Hurricane I’d also put out everything else, and all the chain. For nylon, I have 600 feet of 3/4″ Guess you get the idea that I like anchors and feel that you can never have too many, huh?
. . .
Have a good weekend.
Chuck

Fraser’s stripper . . .

Fraser Howell continues to make astonishing progress on his strip planked version of Chebacco. He sent me a whole bunch of photos of which a small selection are included in this newsletter. The captions are supplied by Fraser.
six4
Here is the bottom, while fitting the CB case. The roughed out laminated stem is just beside the case. You can see that I built up the base of the stem where it will bear on the bottom. This stem enlargement made it easier to fit in a free-standing fashion. I fit it with a 1/2″ stainless steel post that passes through the stem enlargement and the keel ( – I had just broken a molar repaired in a similar fashion). You can also see some distortion of the bottom due to moisture. At this point the ‘boat’ went back into the shed, dried out and came back into shape. I then turned it over and applied the 1/4″ ash veneer in epoxy.

six5
Some time later, transom, main bulkhead, stem and molds ready to be aligned. You can just see the untrimmed edge of the bottom veneer.
six7
A successful rolling crew. I don’t know why the rest of them are smiling, I’m the only one with a beer.
Fraser’s other photos show details of the stripping process, scarfing of strips, breasthook and knee and various views of the hull. He writes:
I made the seat supports, after cockpit bulkhead etc. out of 5/8″ exterior ply. There are two partial bulkheads on each side to support the seat. I placed them at mold stations. This allowed me to use the mold profile rather than scribe them. The forward and after bulkheads were scribed to fit. All bulkheads were epoxy filleted and taped with 4″ wide 10 ounce cloth. I put in all that internal structure to stiffen the hull for the roll-over and hold the shape. Molds 3 and 4 were left in for the same reason.
Presentlly, I’m planing the 1/8″ ash veneers. I will lay them at right angles to the strips, stapled in thickened epoxy. I’ll then fair and seal the hull exterior to leave it through the winter . . .

‘Nencia’

Alessandro Barozzi sent me this photo of Nencia, his lapstrake Chebacco which has no cabin.
six8
‘Nencia’
I fear I must apologise for getting the builder’s name wrong. He is Casavecchia (not Casavecellia). I was also wrong when I described her as an ‘open’ boat. She is mostly decked, with a self-draining cockpit. She is certainly a most attractive boat and may give some of us pause for thought as to whether we really need a cabin, when she looks so good without one.
Alessandro has been out of action recently, with surgery to his right arm. I hope he makes a full and swift recovery so that he can continue to enjoy his sailing.

Bill Samson’s Sheet Ply Chebacco

My own Chebacco is now complete except for spars, sails, outboard and trailer.
six1
Bill’s Chebacco tilted to receive its centreboard and rudder.
The next two photos show the lower gudgeon (pintle??) for the rudder. This is made from galvanised iron. Note the nylon bush to take the downward thrust of the rudder.
six2
Galvanized gudgeon before fitting (Yes- I know it’s countersunk on the wrong side! In fact it is countersunk on both sides.)
six3
Gudgeon and rudder in place; bedded in liberal quantities of Sikaflex.

And Finally

This has been a great year for amateur Chebacco builders with Peter Gray getting into the water and Bill Samson hoping to follow soon. Please do keep in touch and let me have your news. Thanks to those of you who have sent me letters and photos as well as those who have sent financial donations to help keep this little newsletter afloat.

Bill Samson,
88 Grove Road,
West Ferry,
Dundee,
DD5 1LB,
Scotland

w.samson@tay.ac.uk

Have a Merry Christmas and a Happy New Year!


Chebacco News 05

Chebacco News


Number 5, September 1995

It’s time, once more, to report on Chebacco-related news around the world. The weather here, in the UK, has been superb – four weeks of continuous sunshine and counting! No excuses, then for lack of progress in outdoor boatbuilding.

We’re on the Internet!

As I mentioned last time, I was trying to get a World-Wide-Web page set up with Chebacco News in it. It’s there now. The address to connect to is:
http://www.tay.ac.uk/mcsweb/staff/wbs/chebacc4.html
for newsletter number 4, and

http://www.tay.ac.uk/mcsweb/staff/wbs/chebacc5.html
is this one.

Another internet ‘club’ that should be of interest is ‘Bolgerphiles’. If you’d like to participate, drop an email to
cnoto@freenet.scri.fsu.edu
who, in real life, is Chris Noto, of Sweetwater, Tennessee.
Some of you have already found Chebacco News on the net and have told me they don’t need me to send out the newsletter to them any more. This is fine, and saves on printing costs and stamps BUT all readers of the News should feel part of the ‘club’, whether they read the electronic version or get the paper copy in the mail. I’m interested to hear from you however you come to be reading this.

Anchors, toilets, mast jackets, . . .

Phil Bolger mentioned in a recent letter that he would favour a plough anchor – Bruce or Delta for example weighing 25 pounds or more with 200 feet of rode, for a Chebacco. I’ve had letters from a couple of you wondering if I had come across a good way to stow an anchor on board a Chebacco. To my mind the foredeck is rather small to accommodate a hatch, so although the anchor could be stowed up in the forepeak the dirty weedy thing would have to be brought through the cuddy, dripping on your nice floor or sleeping bag!
Personally, I don’t think the forepeak of a light displacement boat is the best place to hold anything heavy. The nearer the anchor and other heavy gear is to the centre of the boat, the happier I am. My plan is to keep the anchor(s) under one of the side benches, getting it in and out through the access hole from the cuddy through bulkhead 4, and the rode on the other side to balance things out. Admittedly, it will drip momentarily in the cuddy but this should be a minimal problem considering the short distance from the access door to the cuddy entrance.
Another possibility you may like to consider is to replace the ‘Jonesport’ cleat at the stemhead by a short bowsprit/cathead to support a plough anchor ready to drop at all times.
If you have any other ideas, we’d like to hear them!
Jim Slakov asked about the anchor, and also about where to keep a portable toilet. He also wonders if anyone has thought about how to arrange a mast jacket. Do you favour mast hoops or lacing for the luff of the mainsail? Again, let us hear your ideas on these or other matters of interest.

How much does it cost?

People embarking on the building of a Chebacco wonder how much it’s all going to cost. I’ve had a couple of letters about this and thought the answer might be of general interest.
The cheapest way to go is to use exterior-grade ply. In the UK this will set you back about £500 ($800) for the 22 sheets needed if you follow Phil’s drawings to the letter, including hollow keel and ply floorboards. The 10 gallons of epoxy needed cost £750 ($1100) in the UK, and the glass cloth £200 ($350). If spars are made from reclaimed wood the cost is negligible. Fittings vary a lot, but making as much as possible yourself (wooden cleats etc) you can probably get away with £200 ($350). The sails would cost about £600 ($1000) ready made, but you can buy the cloth to make them for £130 ($200). Paints and varnish (house paints) will cost about £100 ($160), giving a grand total (assuming home-made sails) of £1880 ($2960) very approximately.
Going the Rolls Royce route with Bruynzeel ply and pricey paints, top class sails and so on could easily set you back four times that much. A lot depends on whether you are building her to sail yourself for the foreseeable future, or are more interested in her resale value when you move on to your next boat.
My own approach was to try to spread the cost as much as possible, so as not to have to shell out too much cash at once. As a result, the ply I’ve used is of a very modest marine grade, but I’ve gone to town on the best paints and varnish (2-part linear polyurethanes) which, unlike the ply, can be bought as and when required. Hopefully, too, they’ll provide good protection for the ply, such as it is.
Depending on how you intend to sail her, you may want to buy a trailer ($1500 or more) and an outboard motor ($800, but second hand motors are often available much more cheaply).

We have a sailor!

At last, a Chebacco sailor (as opposed to builder/dreamer/. . .) has joined our ranks. Alessandro Barozzi of Valfenera, Italy owns a Chebacco built by a builder named Casavecellia. My Italian is very rusty (- it never was shiny -) but I gather from Alessandro’s letter that his Chebacco is the lapstrake version, rigged as per the plans, but built as an open boat, without the cuddy [Alessandro – please correct me if I’m wrong!].
He writes that members of his club describe her as ‘a poem – the most elegant boat on Viverone’s pond’. ‘Nencia’ (for that is her name) nearly came to grief in a ‘Valdostano’ – a powerful wind sxweeping down from Mont Blanc – when she broke away from her mooring and blew away towards the rocky lee shore. Fortunately, she ended up in a quiet corner, bobbing around with some black ducks and only a little scratch on the paintwork to show for her adventure.
Alessandro mentions that she has some weather helm, and is thinking about adding a jib to help her balance better. He also finds her slow to tack, but I suppose this is understandable given that she has a long shallow keel, unlike a conventional centreboard dinghy. Finally, he says that she sails well, with satisfying speed, even in the lightest wind. ‘
Nencia’ is Casavecellia’s second Chebacco. The first one he built was strip planked, Bermudian rigged, had an iron centreplate and an inboard diesel engine (if I understand the Italian technical terms correctly). Alessandro believes that it was a mistake to stray so far from Phil Bolger’s drawings, and made sure that his own craft was much closer to the designer’s intentions.

A Tender for a Chebacco.

As my sheet ply Chebacco nears completion I’ve started to ponder the practical aspects of sailing her. I’ll be keeping her on a deep-water mooring in the Tay estuary and may be a couple of hundred yards from the nearest launching slip for a tender. This can be a fair old distance to row when wind and tide are unfavourable. I wrote to Phil Bolger asking if a stretched ‘Nymph’ might be suitable. He replied suggesting that
[The June Bug] is the best tender design that I know of if you can live with its looks: fast rowing, quick to build, a good carrier and stiff to get into and out of (a weakness of Nymph). Weight about 100 lbs. They’re good sailors, but the rig is too much clutter in a tender.
I also asked him about how a Chebacco would row, if caught out in a calm with a busted outboard (or no outboard at all). He replied:
I imagine a Chebacco would row quite well with, say, nine-foot oars. They have little if any more surface than a Dovekie, which I’ve rowed many miles at three knots. Chebacco’s geometry would not be as good, and think out carefully where you will stow the oars! I would have a long paddle, actually probably a six-foot oar. . . . If you tow the 14-foot tender, you can row that . . .

Windward Performance

You’ll recall that Mark Raymer was considering building a Chebacco-25, but was worried about how well she’d sail to windward. Phil writes:
On the windward performance of the Chebacco-20, it is as good as the sails, which need to be cut with a good flow. Given that, they are close-winded and spirited. The 25-footer is no doubt undersparred for light weather, when she is supposed to use the engine without inhibitions. I’m most confident that she will give a good account of herself in any fair sailing breeze, and that the speed with which she can be rigged and unrigged will add more to her mileage than would a better drifting ability.

My own view is that close-windedness is a matter of what you’re used to, and whether you intend to sail in company with more close-winded boats. For example, I don’t think that Chebacco was ever intended to sail close-hauled with a heavily ballasted fin-keeled bermudian sloop with a bendy mast. I currently sail a 15 foot lug-rigged flattie. I’m always contented with her performance when I sail alone. I sometimes sail in company with racing dinghies like Wayfarers and Enterprises and while the flattie gives a good account of herself on a run or a reach, she’s soon left behind on windward legs. Having said that, I wholeheartedly agree with Phil about rigging time – I can be on the water and away 20 minutes before the racers, which makes up for a lot!
Thanks to those of you who wrote to me about this. I have passed your letters on to Mark.

Fraser’s Stripper

Fraser Howell of Nova Scotia is making excellent progress with his strip-planked Chebacco hull. He writes:
As of today the strip bottom is complete except for the veneer, which is next. I lost some time due to moisture. I was building upright, outdoors. We had some exceptional rains, and the pine strips had warped, mostly I think because of moisture from the ground, as it was under a waterproof cover, with no floor. I moved it to my shed a week ago , and happily the original dimensions returned (whew). Everyone who the bottom out of plywood was right. My method is not cheaper, and requires probably ten times more work. If there is an advantage it is that the final bottom thickness will be one inch. said to make
Given the bottom, here is the sequence I plan to follow;
1. loft and cut molds out of inexpensive plywood sheathing for every station, except transom and #5 which are made from good marine ply
2. make c.b. case, again from good marine ply
3. align the molds and stem on the bottom with the c.b. case inserted in #5, #6
4. brace the molds and epoxy the c.b. case and #5 together, permanently attach stem, #5 and transom to the bottom
5. strip plank the hull
6. turn it over, smooth the hull and apply 1/8″ veneer in epoxy
7. smooth the veneer layer, coat with epoxy
8. turn it back over . . .
I have laminated and roughly bevelled the stem, framed the centerboard case, and completed half of the molds. Having a great time. I got Bolger’s latest book, enjoyed ot a lot.
Looking forward to an exuberant description of the sailing performance.

Fraser also enclosed some detailed sketches of how things are to go together. I’m afraid they are a bit beyond my Microsoft Paintbrush ability, so I’ll summarise what they are about:
The c.b. case has a really neat frame – the for’ard part is made from a straight piece of wood, slit lengthwise several times by bandsaw, glue put in the slits and the whole lot bent to shape forming a strong, laminated member.
The strip planking is to start from the chine, with the first plank being glued to the edge of the bottom. Fraser has cut a set of little bevel guides from the lofting so that the edge is accurately bevelled to accept the first plank.
The strips will be scarfed on the boat with Titebond glue and galvanised finishing nails.
The c.b. case will be finished flush with the pine strips on the outside of the bottom and the edge grain of the ply covered by the 1/4″ ash veneer. The cheek pieces of the keel are made of solid ash and are through-bolted to the logs either side of the c.b. case inside the hull.
There is a mold at each lofting station – not just at bulkhead positions.
There are some photos later . . .

Gil’s Boat

Gil Fitzhugh is making good progress with his lapstrake Chebacco-20.
All the planks are permanently in place, and I’m sanding, filling, sanding, epoxying, sanding, . . . Maybe another couple of weeks and I can paint the hull. The I’ll dragoon some neighbors, ply them with beer and flip the boat. Working outside in the spring and summer gives new meaning to WoodenBoat’s euphemism about building from ‘organic materials’. There’s the bark, twigs, dead leaves and seed pods that land on the work. There’s the flies, spiders, inchworms (2.54 cm worms) [Gil’s practicing, in case ‘The Boatman’ asks him to write an article] that crawl on it. There’s gypsy moth larvae, that feast on leaves and excrete little pellets on everything. All this organic material gets caught in the crevices, or lands in wet epoxy, and leaves residue in the boat. Some of it is, at best, wood by-products. And some is two or three incarnations away from having recognisable vegetable origins.
How much of my $70/gallon epoxy ends up as sanding dust?

[Gil should count his blessings – epoxy costs £75/gallon on this side of the pond!]

And finally

Keep your letters and emails coming. These form the substance of this newsletter. Remember that what may seem obvious or mundane to you could light the way for someone else. Jim Slakov writes:
Keep up the great work: newsletter #3 was the best yet. Of special interest to me was Gil’s method of planking, and the pictures of the two Chebaccos. You wouldn’t believe how I obsess over every detail, especially Story’s version: I like a bit of wood showing, and his lower hatch slide-logs, although that extra height looks good in Bolger’s drawings . . .

Write to me, Bill Samson, with your thoughts, experiences, ideas, dreams, . . .
Bill Samson,
88 Grove Road,
West Ferry,
Dundee, DD5 1LB,
Scotland.
email: w.samson@tay.ac.uk

Photos

fh1
The bottom of Fraser Howell’s strip-planked Chebacco – note the screw caddy!

fh2
For’ard end of Fraser’s keel cheekpieces

fh3
Aft end of keel

fh4
Planking in way of centerboard case

bs1
Bill Samson’s Chebacco – screw hole plugs to be trimmed.

bs2
Bill’s boat, cockpit looking for’ard.

bs3
Bill’s boat, cockpit looking aft.

rudder1
Rudder; post made from galvanised 1″ mild steel.

Chebacco News 03

Chebacco News

Number 3, April 1995

A Frequently Asked Question

Several of you have written to me asking for the address of your nearest neighbour, so that you can perhaps get together and chew the fat. My approach to this has been to contact the neighbour, and ask them to get in touch with the person making the query. That way, I’m not divulging people’s addresses without their permission. It would obviously save us all a lot of hassle if I were to send out an address list with the next newsletter. Those I have spoken to individually say they’d have no objection to this, but some of you might. If you don’t want your name and address to appear in the address list, please let me know right away. In the next newsletter I’ll publish the names and addresses of those of you who remain silent!

Surfin’ the Internet

Three or four of us have Internet addresses and communicate using eMail. It would even be possible for me to send out this newsletter (text only) this way. (I did try sending the last one, but the photos take up one helluva lot of space and the message arrives in lots of parts which are a hassle to reassemble.) Another possibility is that I could put it up on the World Wide Web complete with colour images; but I suspect that not many of us have access to web readers. Anyway, if you’re into the infobahn, my address is:

w.b.samson@tay.ac.uk

Let me know if you have any ideas in this direction.

“Boats with an Open Mind”

I recently got my copy of Phil Bolger’s new book (title above) which was published by International Marine of Camden Maine in November 1994. There’s a great chapter on Chebacco boats – the versions except the original cold moulded one, and including a “glass house” version with balasted keel, more freeboard and a huge cabin with glass sides – worth thinking about if comfort matters and you plan to sail in rougher than average waters. You can even steer it from inside the cabin! As well as this, there are another 74 designs, some old, some new. I must confess I devoured every word of it with great relish. Essential reading for all Bolger fans.

Lapstrake Construction

Last time I gave you a blow by blow account of how a sheet ply Chebacco could be put together. In order to redress the balance for lapstrake builders, Gil Fitzhugh of Morristown N.J. gives the following account of the method he is using for spiling and fitting strakes:

I’ve accidentally blundered into what I think is an easy way to determine plank shapes in glued lapstrake plywood construction. I haven’t seen this written up anywhere, so feel free to put it in the next newsletter. It assumes you are using a building mold the way Tom Hill does, in his book “Ultralight Boatbuilding”, with a series of ribbands to define where the planks go.

Unlike the Chebacco, Tom’s plans and molds are small. He uses 4mm ply, narrow enough to be clamped into place with C-clamps. He clamps some plywood in place and traces the shape from the back by tipping the mold. For me to do that in the Chebacco means getting under the mold between each pair of stations, tracing the shape onto cheap quarter inch ply, and spiling it onto solid gold occume plywood. The pieces are heavy and awkward and the process requires considerable agility. So, a better way.

1. Put the last plank, the one lying on the shop floor, in place on the boat. Mark off where the next plank will land and plane the bevel.
2. Buy, or scounge enough scraps of Mylar that you can tape together a long strip, roughly the shape of the plank, but wider. The joints between the pieces can overlap as much as you want and can be attached with masking or other tape, BUT THE JOINTS MUST BE FLAT. (- no wrinkles or bulges.)
3. Roll up your strip of Mylar, take it to the boat, unroll it and tape it over the space where the new plank will go. It only requires a few hunks of tape. The Mylar MUST LIE FLAT between the bevel of the previous plank and the next ribband. Since Mylar is dimensionally stable it doesn’t take compound curves, it will lie just as flat as the next plywood plank.
4. Standing in a civilised manner on the outside of the boat, make little marks every 4 – 6 inches along the bevel line of the prior plank, and the next ribband. If you want to do both sides of the boat use two different pencil colors.
5. Roll up the Mylar, take it into the shop and unroll it over the next piece of plywood. Using an ice-pick, prick right through the Mylar into the plank stock. Remove the Mylar, clamp a batten around the prick points, draw a line, cut with a saber saw, Voilà a plank!

When it’s time to do another plank erase the x marks and reuse the same piece of Mylar. After a while it’ll have a potfull of stray prick holes in it, but that won’t affect its usefulness one whit. If the plank shape changes as you move down (up?) the boat, you can untape your Mylar segments and put them back together again in a little different alignment. In between uses, roll the Mylar up and stick the end in an old coffee can – try that with 20+ feet of spiling board!

I find I can scarf up quite narrow strips of 12mm ply to get my plank blanks, by aligning them under the Mylar and jiggling them ’til they fit. Other than the garboards, which are wider on this boat, I find I can get two whole planks, a port and a starboard, out of a single 4 X 8 sheet. So it’s economical of material as well as time.


A Stripper Chebacco

Fraser Howell of Nova Scotia reports that he’s just started making a round-bilged Chebacco to the lines of the lapstrake version, using strip planking. Fraser has built a number of strippers, including canoes and a “Catspaw” dinghy, so he’s at home with the technique. He plans to strip plank the hull from half inch pine strips and then cover the lot with a diagonal layer of eighth inch ash (sides) and quarter inch ash (bottom). The whole lot will, of course, be epoxy coated.

Cockpit cover:

One of Chebacco’s great strengths is its huge, deep cockpit. Unfortunately, cockpits in boats of this size can’t be deep and self draining at the same time. A cover is therefore needed to keep the cockpit reasonably dry. If the boat is kept on the water, a cover going over the boom would seem to be the right sort of thing. Brad Story writes:

. . . the ones I’ve seen go over the boom, with snap-up cutouts for the halliards and topping lift. This way it serves also as a sail cover. This cover was secured along the edge of the deck with eye straps. These straps along the coaming would work at least as well. They’d cut down on the cover flapping – though they might chafe the finish on the coaming edge. The cover is over the cockpit only, (though a tail extends fwd and aft to cover the sail). It’s held onto the eye straps with a piece of cord thru eyelets in the cover – a little tedious to put on/take off, but strong and foolproof.

And Finally:

We depend on you to tell us what is of interest, so keep these letters coming. Even if you haven’t started building yet, you must have given some thought to where you want to do it. Will it be in a garage? Or a tent? Or out of doors? Let’s hear your thoughts on these and any other matters of interest.

My address is:

Bill Samson,
88 Grove Road,
West Ferry,
Dundee,
DD5 1LB,
Scotland.

Phone +44 (0)1382 776744 (Home)
+44 (0)1382 308611 (Work)
Fax +44 (0)1382 308877
eMail w.b.samson@tay.ac.uk

Stop Press

Peter Gray’s Chebacco nears completion. It will be launched in Queensland, Australia. Peter has used 9mm ply for the decks in order to cut down on high weight. He plans to install a 12V bilge pump to keep the cockpit dry. He has made his rudder stock from 2″ dia steel pipe which will be galvanised. The mainmast is made from Oregon pine. Will this be the first amateur-built Chebacco to hit the water? Watch this space!