Chebacco News
Number 16, July 1997
The BIG one!
I had this email from Simon Jones (sjones@hal9000.net.au):
G’day Bill!
With some trepidation and not a little awe, l write to say that l have
committed myself to building a Chebacco 25 (the big chewie!), presently
looking at any possible modifications to improve the original, have really
enjoyed reading the newsletters, and hope to be able to put some of the
ideas into practice (forewarning of any real stupid mistakes accepted in
confidence, sure I’ll need it!). Many years a sailor and this is my first
building project, I’m hoping to start towards the end of the year and take
about a year, and l would greatly appreciate you putting me in touch
(especially by email) with any of the other builders.
yours….Simon Jones.
WOW! So, at last, one of us has taken the plunge. I’ve put Simon in touch with some Lapstrake Chebacco builders, but of course this (as far as I know) will be the first `25 to start building. We look forward with interest and bated breath to hearing more about this ground-breaking task!
Memories of July ’96
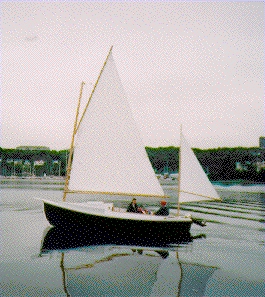
Bill Parkes takes the helm of ‘Sylvester’
I (at last) got a film developed that has been in my camera since last summer, when Bill and Mary Parkes of Mechanicsburg, PA, visited. Bill, Donald McWhannell and I went for a cruise up the Tay estuary. It was a beautiful day, with light winds, and we went with the tide upriver to Balmerino (about 8 miles) and back again to West Ferry, using the outboard when the wind dropped completely . . .
‘Itchy and Scratchy’ . . .
Fraser Howell of Nova Scotia has sent me some photos of his strip-planked Chebacco ‘Itchy and Scratchy’ –
Hi Bill,
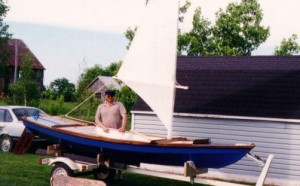
Finally, some pictures, as you recently referred in the Newsletter . . . This is Chris Bennet and I (in the hat).
This picture of us leaning on Itchy and Scratchy was our first ever night out.
You may notice how the heavy motor, 10hp, trims her down by the stern. A smaller motor would be more appropriate (unless I can get it to plane!). I’m going to try a prop with less pitch.
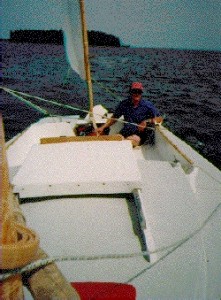
You can see in this shot looking aft how little weather helm she carries. I’m going to rig a self-tending jib and a tiller comb before I launch in May.
Self-bailing cockpit?
Fraser also sent me an email –
Bill; have you considered a self-bailing cockpit ? What would you think of
another cockpit floor, just above the wl, draining into holes cut into the
cb case ? The thing would be 3/4 in plywood, made rigid with supports. Air
circulation from additional cut-outs into the cabin. I’m thinking more of
rain drain than increased seaworthiness or storage. I got the pictures back
safe and sound. I am going to launch on the weekend of June 13. It is still
too cool in Halifax on the water for comfort on a small boat. In getting
ready, I noticed some unevenness in the veneers. I had to re-glue the edges
of some, so I resealed the hull and painted her white. I hope this will not
become an annual event. I think that I might have been better off sheathing
her in heavy cloth and epoxy rather than the hardwood veneers. Other options
to bailing rain are a boom tarp or a bilge pump with battery and solar panel.
Fraser
Here’s how I replied –
Hi Fraser,
As you may know, I use a boom tarp. The only self-draining Chebacco I
know of is Alessandro Barozzi’s – this is an open version (no cuddy) and
the cockpit has no footwell! I.e. the seats go all the way across and
water drains over the inner transom into the outboard area. I don’t know
how he deals with raising and lowering the centreboard, but no doubt it
would be pretty straightforward to design some feasible system. This
style of cockpit could be combined with a smallish footwell which is
covered by a lid when not in use – like the one in Micro. On the other
hand, one of the attractions of Chebacco, for me, is the armchair-like
comfort of the cockpit!
I’m contemplating an article in CN on how to make a boom tarp – giving
dimensions. I made one from blue polytarp in an afternoon – It’s lasted
over a year.
Cheers,
Bill
It also occurred to me that the Chebacco’s cockpit can be swamped and the water could only get as high as the seats before draining out over the inner transom. I’m pretty confident the Chebacco would sail reasonably well in this state (- I tried it with my model Chebacco -) so a self draining cockpit isn’t really needed for safety – it would simply avoid the need for covering the cockpit at a mooring, or pumping out.
Fraser also reports that he’s going to try a self-tending jib with a boomed foot. I look forward to hearing how it worked out.
Getting rid of Epoxy Drips
Dick Burnham emailed me with the following query-
On another note, how do you guys clean up WEST epoxy? On my little canoe
it is one mess on the inside since I built in upside down and couldn’t see
inside until it came off the jig. I’m fearful of putting the belt sander
to it because the plywood is a mere 4mm thick, and the outer veneer is as
thin as frog hair…. Currently, when roused to solve the problem, I’m at
it with — alternatively, a block plane and a Stanley preformed metal job
which is something of a cross between a plane and the coarsest rasp afloat.
The site of the issue, as I didn’t make clear, is on the inside of the
lapstrakes. The problem should be identical on the Chebaccos.
I referred him to Gil Fitzhugh, who replied in his inimitable style! –
I know of no fun way to take hardened lumps of epoxy off the insides of
plywood strakes, but there are some effective if tedious ways. For truly
egregious runs, slicing down the right-way-up hull (from the blobby end of
the run to the plank from which it cometh) with a narrow chisel gets you
started. You don’t want to shave the run so flat that the corners of your
chisel dig into your precious veneer. When you’ve chiseled enough that your
runs have fairly flat tops, but are still proud of the plank, switch to a
flexible cabinet scraper, again scraping parallel to (not across) the run.
In this step I generally scrape from the plank lap up to the blob. You can
take off a truly microscopic shaving, and blend the run totally into the base
coat of epoxy. (You did coat the inside of the plank before you permanently
installed it, didn’t you? And let it dry? And sand it smooth while it was
still lying flat and unobstructed in your shop, and not all squoonched around
a narrow hull? You didn’t? Aww-w-w-w!)
If the run has set up rock-hard, a few passes with a hair-dryer will soften
it for cutting with a chisel. The scraper seems to work fine on hard epoxy,
but you’ll have to sharpen it fairly often.
I don’t think 4mm ply is a good match for a belt sander once the planks are
bent around the boat. When the planks are flat, well, maybe. But be bloody
careful. I like your analogy to frog hair.
If you ever build another boat, you may prefer to avoid this problem in the
first place. When you offer up your plank to the hull for its very last
trial fit, mark it with a pencil line on the inside where the prior plank
overlaps it. This doesn’t take a lot of acrobatics – just hold a pencil
against the edge of the previously installed plank, and slide it along. When
you take the plank off the hull for the very last time, you’ll see exactly
where the overlap will occur. Mask it off with tape. Paint thickened epoxy
only on the unmasked edge. Leave the tape on while you clamp the plank in
place. Thickened epoxy will dribble out on the masking tape. Reach
underneath and peel off the tape. It doesn’t have to come off in a single
strip; in fact, you’ll probably have to tear it around bulkheads, molds,
etc. This tape will be a yucky, slithery, slimy, god-awful mess, which you
will allow to infiltrate and harden upon your shop floor, your wastebasket,
your hands, your glasses, your clothing and your hair – everywhere, in fact,
except the inside of your hull. You won’t have eliminated the excess epoxy,
but you’ll have been selective about where you let it do its thing.
Butt straps – epoxy etc. –
Burton Blaise emailed me about butt straps in the sheet ply Chebacco-20 he’s building:
Just thought I’d get in touch to keep you apprised of my progress on
the Chebacco-building front. At this time, I have just completed fastening
the topsides and bottom panels onto the frames and bulkheads using
bronze screws to hold the panels in place and epoxy fillets/glass taping
for ultimate strength and permanence. I found that, while this operation
is fairly straightforward, the topsides experienced considerable strain,
especially at the bows, which resulted in my butt joints cracking at the
seam between the two butted sections (the butt joints were made with
epoxy and 1/2″ plywood butt straps, as explained in the plans and
according to previous Bolger designs). I’m not really sure what went
wrong here – maybe too much twist and an improperly made butt joint
(though I’ve made similar joints before with good old fashioned
polyester resin and never had a problem). This is the first time that I’ve
ever used epoxy, and I must say that I find the stuff to be a pain in the
butt (pardon the pun) to work with – this stuff takes much longer to set
than polyester and it seems somewhat brittle once it has cured – I
noticed that unless the epoxied/taped joints have fully cured (i.e., >2
days at 20C during the daytime), any stress in the joint can cause the
tape to delaminate or the fillet to “crack”. Once fully cured, however, the
joints seem to be all right and can take stress (though I haven’t really
forced them too much for fear of causing real damage). I sure hope
that the finished product turns out OK in terms of strength, durability,
etc.. In your judgement, are these experiences with epoxy fairly normal?
Also, I noticed that the epoxied surfaces remain “sticky”, even though
the epoxy has hardened to a full cure (i.e., after several days). When I
wash with water, the stickiness is removed. Is this stickiness caused
by the famous “amine blush” which I’ve read occurs with epoxy?
Anyway, to get back to the cracked butt joints, this unfortunate
occurrence affected the fairness of the panel’s curve at the joint, and I
have remedied the situation by using a combination of “Spanish
windlasses” and clamps to draw the edges of the butted sections back
into alignment as best as I could. Then I strengthened the joint by
applying gobs of thickened epoxy to the other side of the butt joint (on
the outside face of the hull), trying to work the stuff into the thin fissure,
and then applying a strip of fibreglass tape to cover this seam, and
filling with epoxy. This has now cured, and seems to be fairly strong (I
hope that it will be even stronger in the end, once the whole hull has
received its fibreglass sheathing). I will of course now have to do quite
a bit of sanding and fairing of the outside face of the hull to
restore the fairness in the panel’s curve at this point. BTW, what should I
use for fairing – can I use Bondo, or thickened epoxy? If I use Bondo, will
the final fibreglass/epoxy sheathing stick well to it?
My next step is to proceed with tracing the shape of the bilge panels,
and then comes the keel and centerboard case (the latter has already
been built, and is waiting to be slid into place through the slots already
cut into the bottom panel and no. 4 bulkhead – BTW, I used Brad Story’s
technique of lining the inside surfaces of the CB case with Formica using
epoxy as the adhesive: seems to work fine). At this point, I can’t wait to
have the basic hull completed, sheathed, and turned over (since my
building shed is rather cramped, and I don’t feel like taking it apart yet, I
intend to use the “gorilla” technique to turn over the hull – that is,
convince a gang of friends and neighbors to carry the hull out, flip it
over, and carry her back in to rest on the building cradle – I’ll have to
stock up on some beer for this operation..).
That’s about all for now. As usual, I shall await your advice and
suggestions in great anticipation.
Hope you’re enjoying some fine sailing weather. I haven’t been out in my
Gypsy yet, as I’ve been too busy building a boat and mowing the lawn
these days, but I do hope to get out on the St. Lawrence river soon.
Cheers,
Burton
Burton Blaise with his Bolger ‘Gypsy’
Wow! Plenty to discuss here.
Butt-joints – They’re certainly not the strongest way of joining two sheets of ply, especially if the butt block is on the inside of a bend (as it invariably is in boatbuilding). My daughter, Amy, did a school project a couple of years ago on the comparative strengths of scarf joints, butt-block joints, taped butt joints (i.e. glass tape either side) and ‘glass welds’ – where the two pieces are planed away to give a shallow ‘V’ which is subsequently filled with layers of glass and epoxy (a poor man’s scarf). Of these, the strongest (with 1/4″ ply) was the taped butt, which was stronger than plywood with no joint at all. The scarf (properly done) was as strong as unjoined wood, the ‘glass weld’ was very variable and the butt strap the weakest of all. The only merit of butt-block joints is their simplicity. Nevertheless, with a layer of glass on the outside of the joint, it is at least as strong as the taped butt, so I reckon the strip of glass tape you’ve applied will achieve this. The problem will be to get a fair surface without sanding away all the good glass.
Another point is that butt straps should always be nailed, as well as glued – this takes the strain off the outer veneers of the ply, which are the first thing to go when a butt strap joint fails. I put clenched copper nails in the butt straps I used in Sylvester – about 8 per joint.
Amine Blush – Most makes of epoxy suffer to a greater or lesser degree from amine blush – a sticky residue on the surface of the cured epoxy – especially if the epoxy has cured at a lowish temperature in humid conditions. It’s harmless and washes off with water without affecting the strength of the joint.
Using Bondo – Officially, Bondo (‘Plastic Padding’ in the UK) being based on polyester resin, is not recommended as a filler for an epoxy coated surface. I think it’s true that the bond would be mechanical, rather than chemical and so not as reliable as using thickened epoxy. I certainly wouldn’t use it before sheathing with glass. On the other hand I used it myself (or a similar product) for fairing during painting. It’s only when you start painting that the final unfairnesses come to light and Bondo-type products are so convenient to use – quick setting, easy sanding. So far it hasn’t let me down.
And finally . . .
Well, that’s all this month’s news. I got some photos from Australia today, but they’ll have to wait for the next issue. Remember – I depend on you all for news, pics, ideas, suggestions, dreams, . . . So don’t hesitate to put pen to paper, finger to keyboard, or whatever and (e)mail it to me:
Bill Samson,
88 Grove Road,
West Ferry,
Dundee,
DD5 1LB,
Scotland
email – wbs@sol.co.uk
Phone +44 1382 776744

